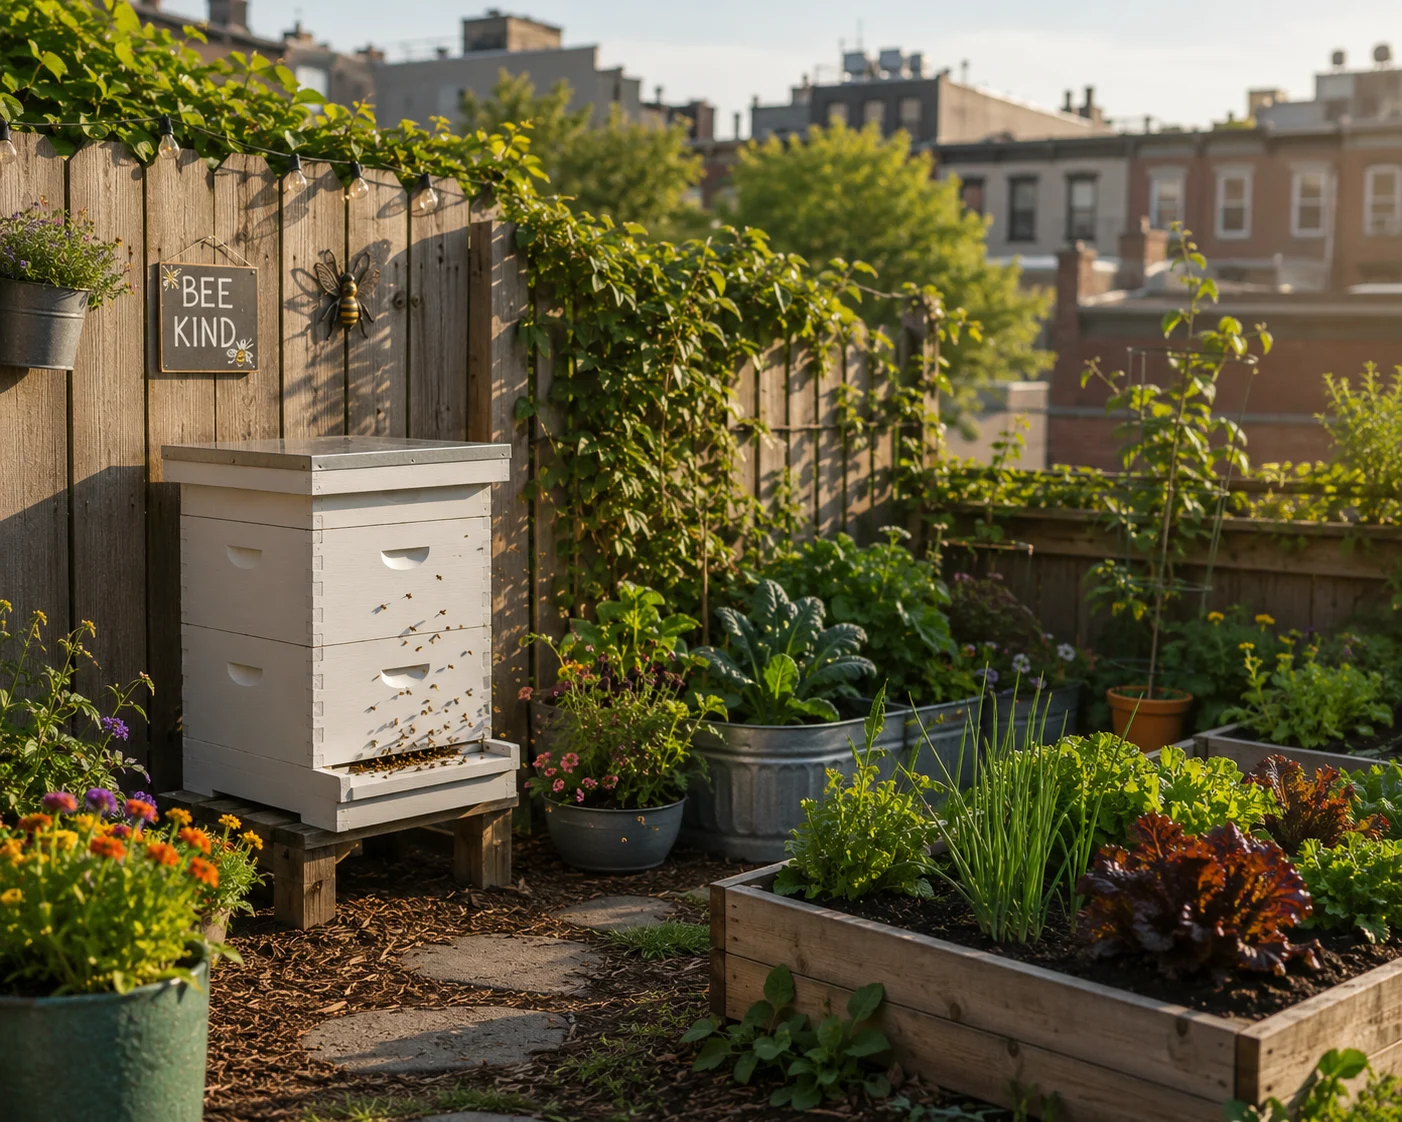
The most common reason people give for not keeping bees isn’t money. It isn’t time. It isn’t even fear of stings. It’s space. “I’d love to keep bees, but my yard is just too small.”
Here’s the truth that every urban and small-garden beekeeper already knows: honeybees don’t care how big your yard is. A colony of 50,000 bees forages up to three miles in every direction from the hive. The size of the plot the hive sits on is essentially irrelevant to the bees. What matters is the size of the foraging landscape — and in most American cities and suburbs, that landscape is rich enough to sustain productive, healthy colonies year-round.
Rooftop hives thrive in the middle of Manhattan. Backyard colonies produce surplus honey in 400-square-foot urban lots in Chicago, Portland, Austin, and Atlanta. Community gardens in Boston, Detroit, and Los Angeles have run successful apiaries for years. The constraint isn’t space. It’s knowledge — specifically, the knowledge of how to adapt standard beekeeping practice to a small-space context in a way that’s safe, legal, neighbor-friendly, and genuinely productive.
This guide covers everything you need to make that adaptation. We’ll walk through US urban beekeeping laws, the right hive types for small spaces, precise placement strategy for yards and balconies, neighbor communication, forage planning for urban environments, and the specific management adjustments that make small-space beekeeping different from a rural apiary. By the end, you’ll know exactly whether your space qualifies, what setup it needs, and how to get started.
Is Beekeeping Legal in Your City? The US Urban Beekeeping Law Landscape
This is the first question — and it needs an honest answer before anything else, because keeping bees illegally in a residential area is a fast route to losing your colony, your equipment, and your relationship with your neighbors in one bad afternoon.
The good news is that urban beekeeping legality has expanded dramatically across the US over the past fifteen years. Cities that once banned backyard beekeeping entirely have reversed those laws as awareness of pollinator decline has grown. The general trend is strongly permissive — but the specifics vary enough by jurisdiction that you must verify your own situation before you spend a dollar on equipment.
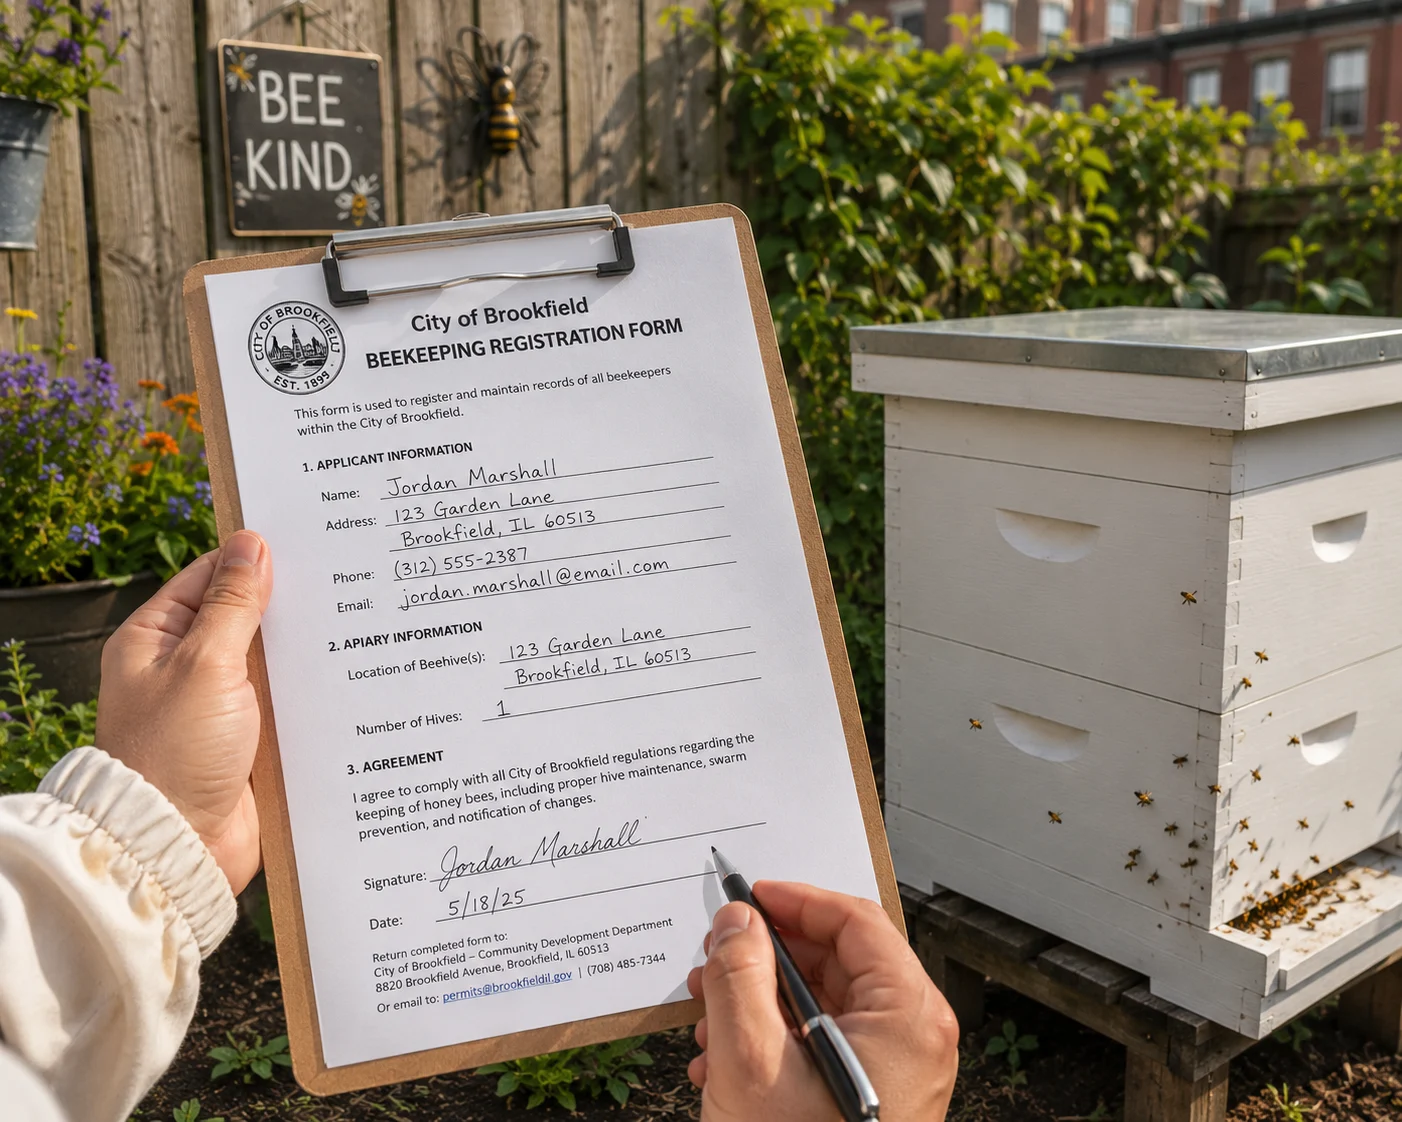
Cities where urban beekeeping is explicitly permitted (with conditions): New York City legalized backyard beekeeping in 2010 after a decades-long ban. Chicago permits up to five hives per residential lot. Los Angeles, San Francisco, Seattle, Portland, Denver, Austin, Washington DC, and Boston all permit residential beekeeping with varying setpoint requirements. In most cases, the conditions involve minimum setback distances from property lines and neighboring structures, a cap on the number of hives, and in some cities a registration requirement with the local agricultural authority.
How to verify your specific situation: Contact your city or county agricultural extension office first — they handle beekeeping registrations in most jurisdictions and will know the current rules immediately. Then check your HOA covenants if you live in a planned community — HOA rules can prohibit beekeeping even where city ordinances permit it, and HOA restrictions are privately enforceable regardless of municipal law. Finally, check your state’s department of agriculture website; most states require hive registration and some require an annual inspection fee, but these are typically straightforward and inexpensive processes.
The Apiary Inspectors of America maintains a directory of state apiary inspectors and can point you toward the right regulatory contact for your specific state. This is the most reliable starting point for understanding your legal landscape before any other step.
Choosing the Right Hive for a Small Space
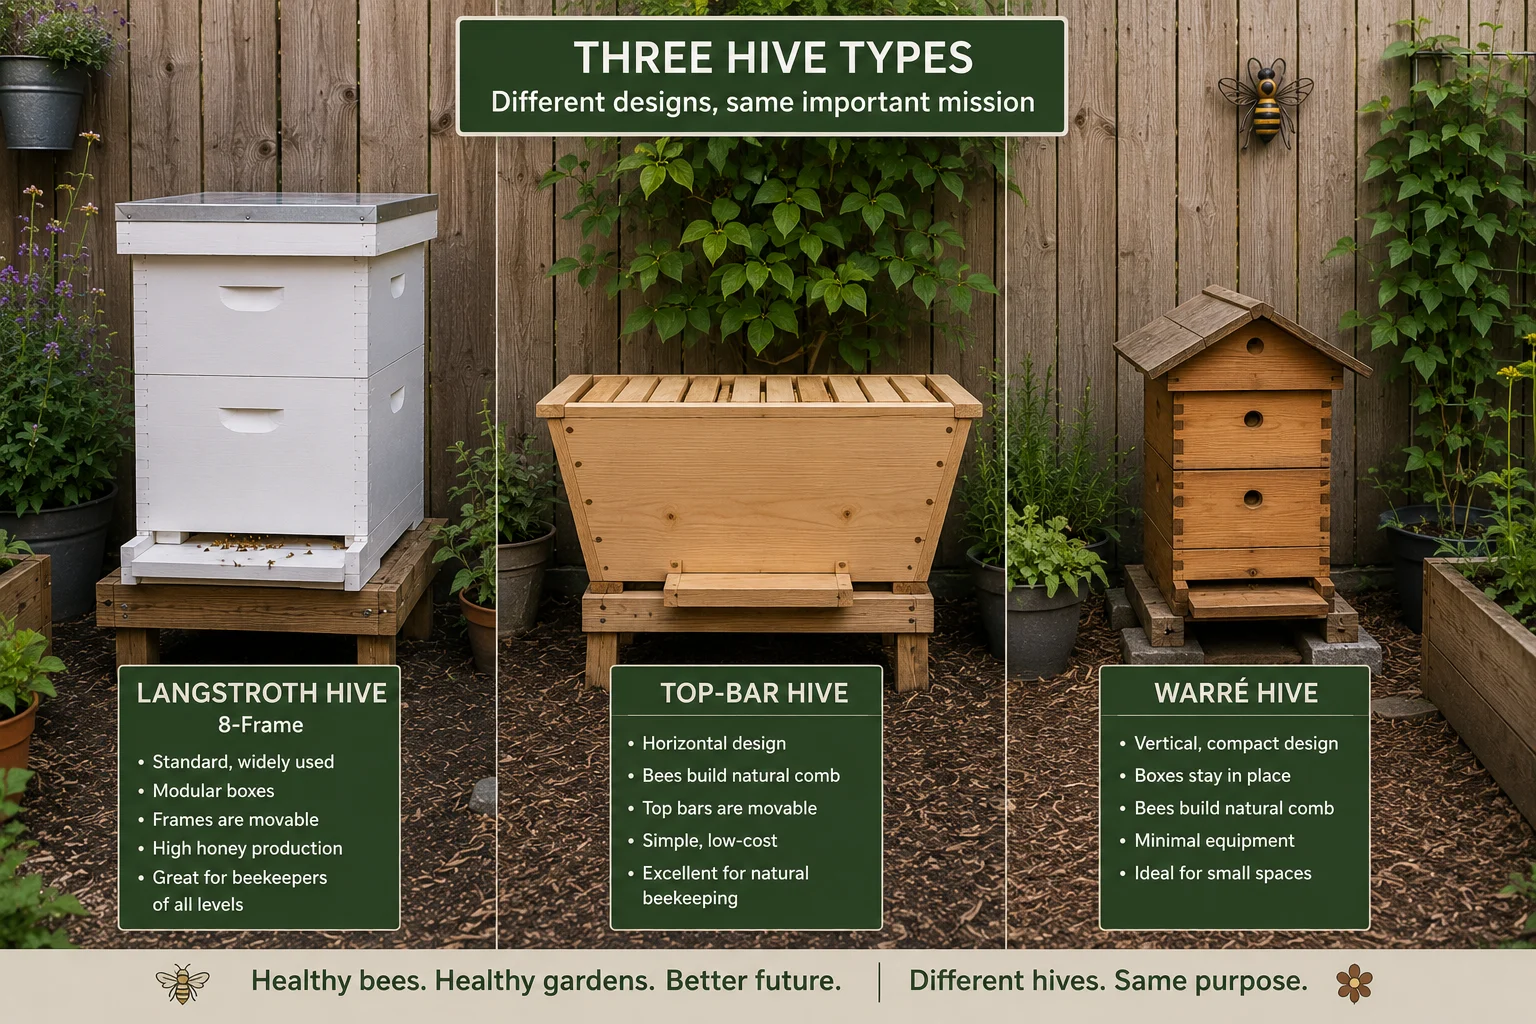
Not all hive designs are equally suited to small-space beekeeping. The standard ten-frame Langstroth hive — the dominant format in American beekeeping — is excellent for production beekeeping in a large apiary but has some genuine disadvantages in a compact urban yard. Understanding the options and their trade-offs gives you a significant setup advantage from day one.
The 8-Frame Langstroth — The Best Starting Point for Most Small Gardens
The 8-frame Langstroth uses the same frame system and the same accessories as the standard 10-frame hive, but is narrower and lighter. A full 8-frame honey super weighs roughly 20–25 pounds less than a full 10-frame super — a significant practical advantage when you’re working in a tight space with limited room to maneuver heavy boxes. The colony size it supports is slightly smaller than a 10-frame hive, which actually works in favor of the small-space beekeeper — a somewhat smaller colony is easier to manage in a confined area and produces less of the peak-season congestion that drives swarming.
The 8-frame system is fully compatible with the mainstream American beekeeping supply chain. Every major supplier — Mann Lake, Dadant, Brushy Mountain, Kelley Bees — stocks 8-frame equipment. Frames, foundations, extractors, and accessories are all interchangeable with the 10-frame standard. You are not buying into an obscure system with limited support.
The Top-Bar Hive — The Best Option for Balconies and Very Small Footprints
A top-bar hive (TBH) is a long, horizontal single-box design with no supers. Bees build natural comb hanging from removable bars rather than working in stacked boxes. For a balcony or rooftop installation, the top-bar hive has two decisive advantages: it has a smaller footprint than any Langstroth setup (a standard TBH is roughly 4 feet long and 18 inches wide), and it never gets taller, since there are no boxes to stack. This makes it significantly more stable and less visually imposing in a small space.
The trade-off is honey production — a well-managed TBH will produce less extractable honey than a Langstroth, partly because the natural comb must be crushed and strained rather than spun in an extractor, and partly because the colony size it accommodates is naturally smaller. For a small-space beekeeper whose primary goal is supporting pollinators and getting some honey rather than maximizing yield, this trade-off is entirely reasonable.
The Warre Hive — The Low-Intervention Alternative
The Warré hive (developed by French beekeeper Abbé Warré in the early 20th century) is a vertical hive like the Langstroth but uses smaller boxes and is managed on a minimal-intervention philosophy — new boxes are added at the bottom rather than the top, and the colony is generally left to manage its own internal affairs more than in conventional Langstroth management. For a beginner in a small space who finds the idea of regular deep inspections daunting, the Warré offers a gentler introduction. Its smaller box size also makes it more manageable in tight quarters.
The disadvantage is that Warré equipment is less standardized than Langstroth — you’ll have fewer suppliers, less community support, and more limited options for accessories and replacement parts. It’s a solid choice for the right beekeeper but not the default recommendation for a first hive.
Placement Strategy: The Small-Space Rules That Change Everything
In a standard rural apiary, placement is relatively forgiving — there’s usually enough space to find a good orientation with adequate setback from any boundary. In a sub-50m² yard or on a balcony, placement becomes a precision exercise. The decisions you make here determine not just how well your colony performs, but whether your beekeeping remains welcome in the neighborhood.
The Flight Path Rule — The Most Important Decision You’ll Make
In a small yard, the single most important placement principle is controlling where your bees fly when they leave the hive. In an open rural setting, foragers rise from the entrance and disperse in all directions at low level. In a fenced urban yard, the same behavior sends bees directly into your neighbors’ airspace at face height — a reliable source of complaint and conflict regardless of how gentle your bees are.
The solution is the fly-up barrier — a solid vertical screen, fence panel, or dense tall shrub positioned 6 feet directly in front of the hive entrance. When foragers leave the hive and immediately encounter a solid obstacle, they turn upward to navigate over it, gaining altitude before they clear the barrier. By the time they cross your property line, they are flying at 8–12 feet or higher — well above the head height of anyone in a neighboring yard. The fly-up barrier is the single most effective tool for making small-space urban beekeeping neighbor-compatible, and it works reliably in yards as small as 10 feet deep.
The barrier needs to be at least 6 feet tall and extend at least 3 feet beyond the hive on each side. A wooden fence panel, a trellis covered with climbing plants, a dense evergreen hedge, or a purpose-built privacy screen all work equally well. Many urban beekeepers choose a living barrier — a trellis of climbing roses, jasmine, or honeysuckle that serves as both fly-up device and additional forage source simultaneously.
Orientation in a Small Yard
The southeast-facing rule applies as firmly in a small yard as in a large apiary — morning sun on the entrance, afternoon shade on the hive body. In a small yard, achieving this often requires creative positioning: angling the hive at 45 degrees in a corner, placing it along a diagonal of the lot, or using the natural shading of an adjacent building to provide afternoon protection. Spend time observing how the sun tracks across your yard through the day before deciding on a final position — a simple 20-minute observation on a sunny morning will tell you everything you need to know about your light angles.
Setback Requirements and Property Lines
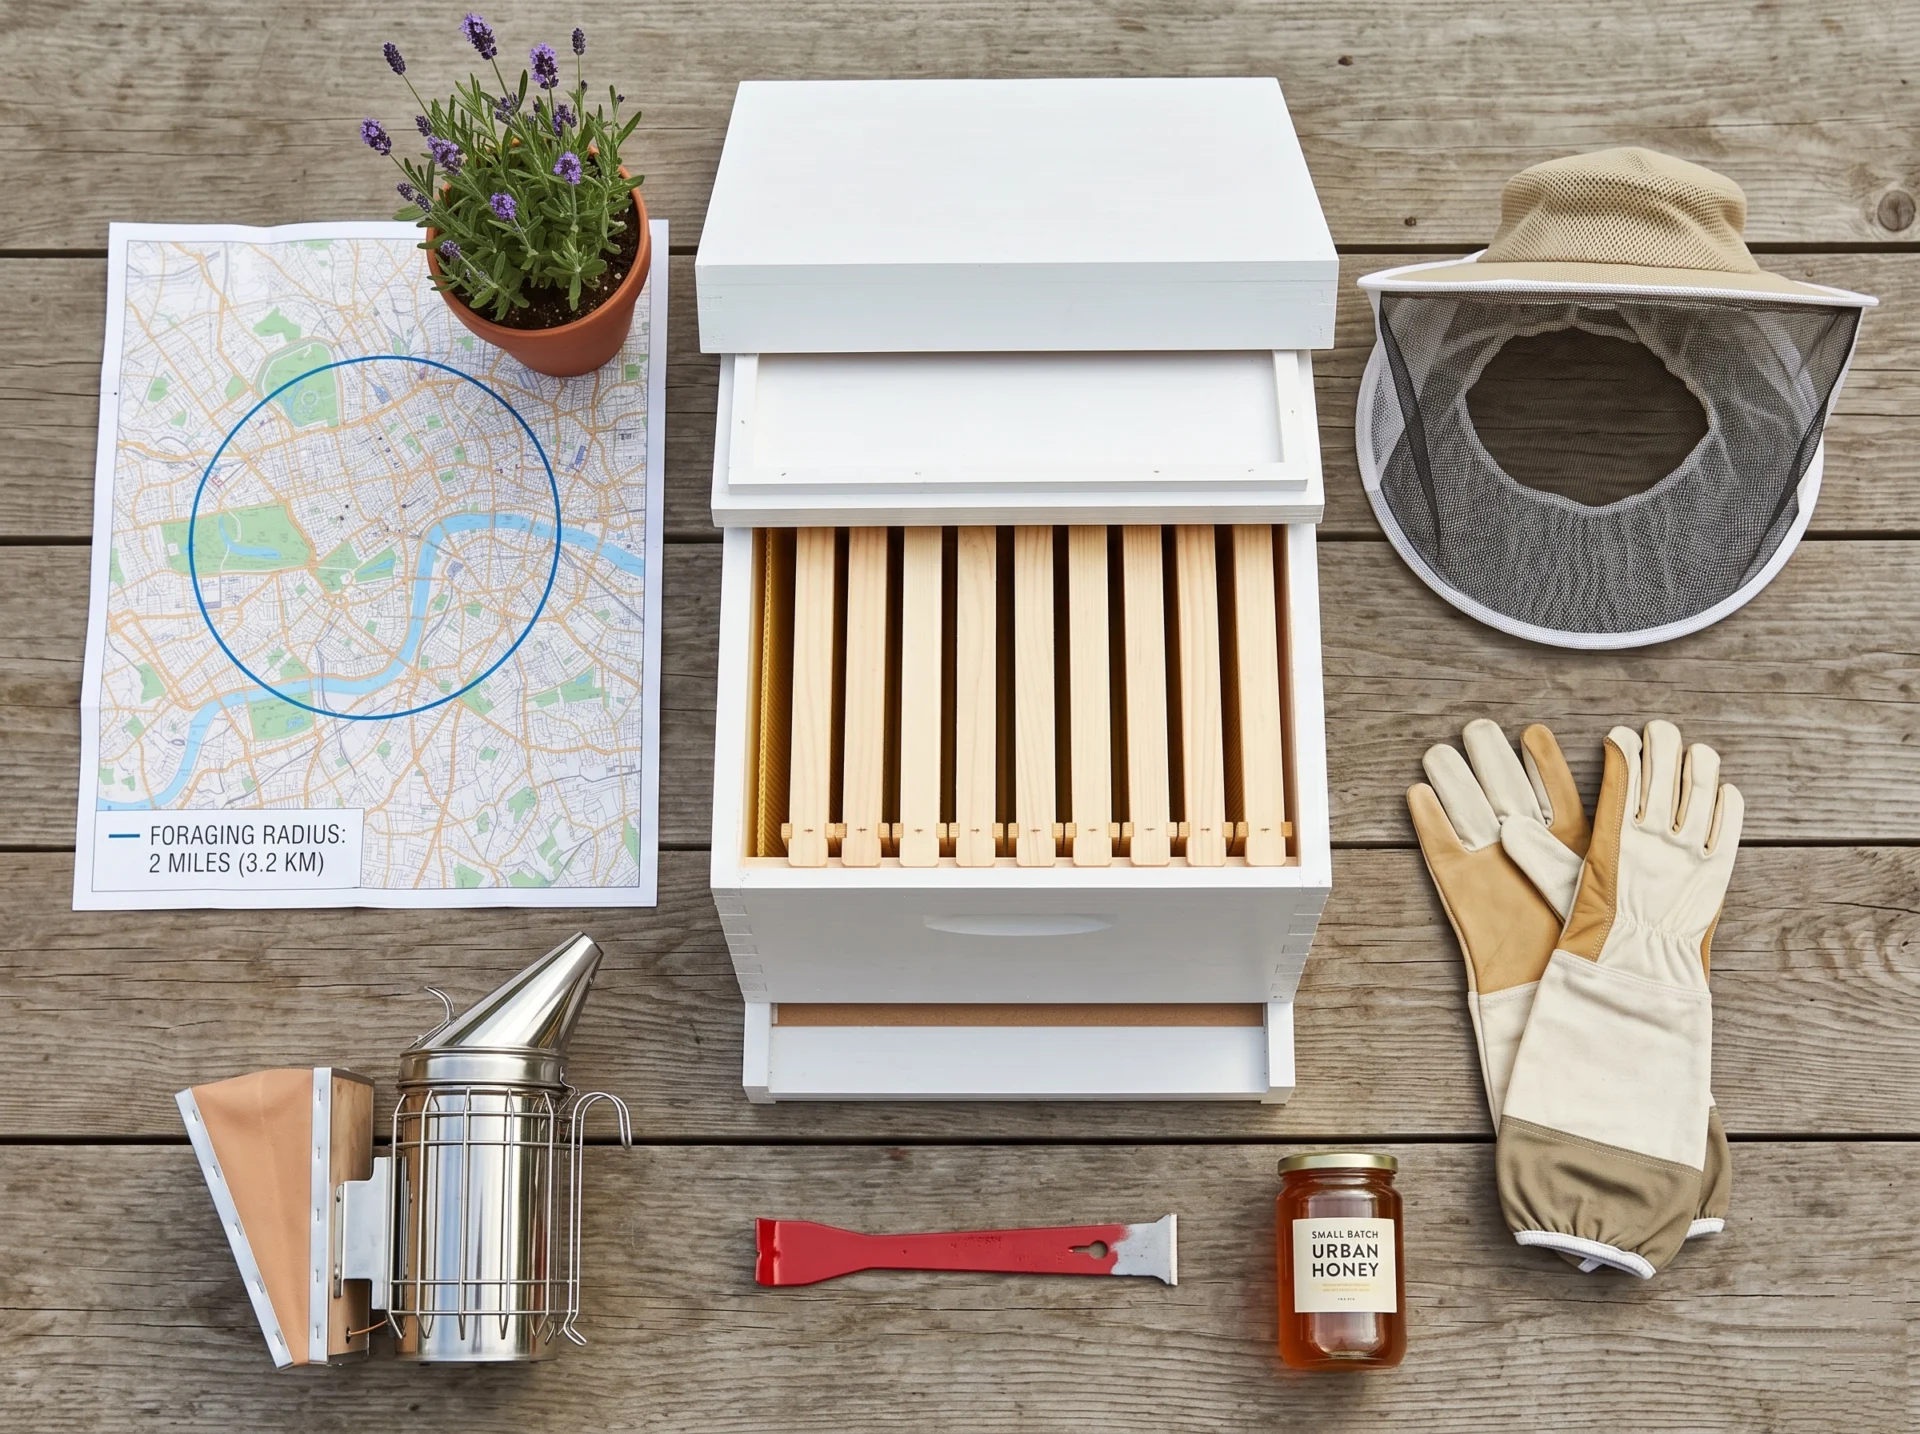
Most US cities that permit urban beekeeping specify a minimum setback distance from property lines — typically 10–25 feet depending on the jurisdiction. In a yard under 50m², meeting a 25-foot setback from all boundaries is often physically impossible. If your city has strict setback requirements that your yard can’t accommodate, check whether a fly-up barrier satisfies the setback as an alternative compliance option — many municipal codes accept this provision. If your code does not have a barrier provision, contact your local beekeeping association: most have experience navigating variance requests and can advise on the most effective approach for your specific municipality.
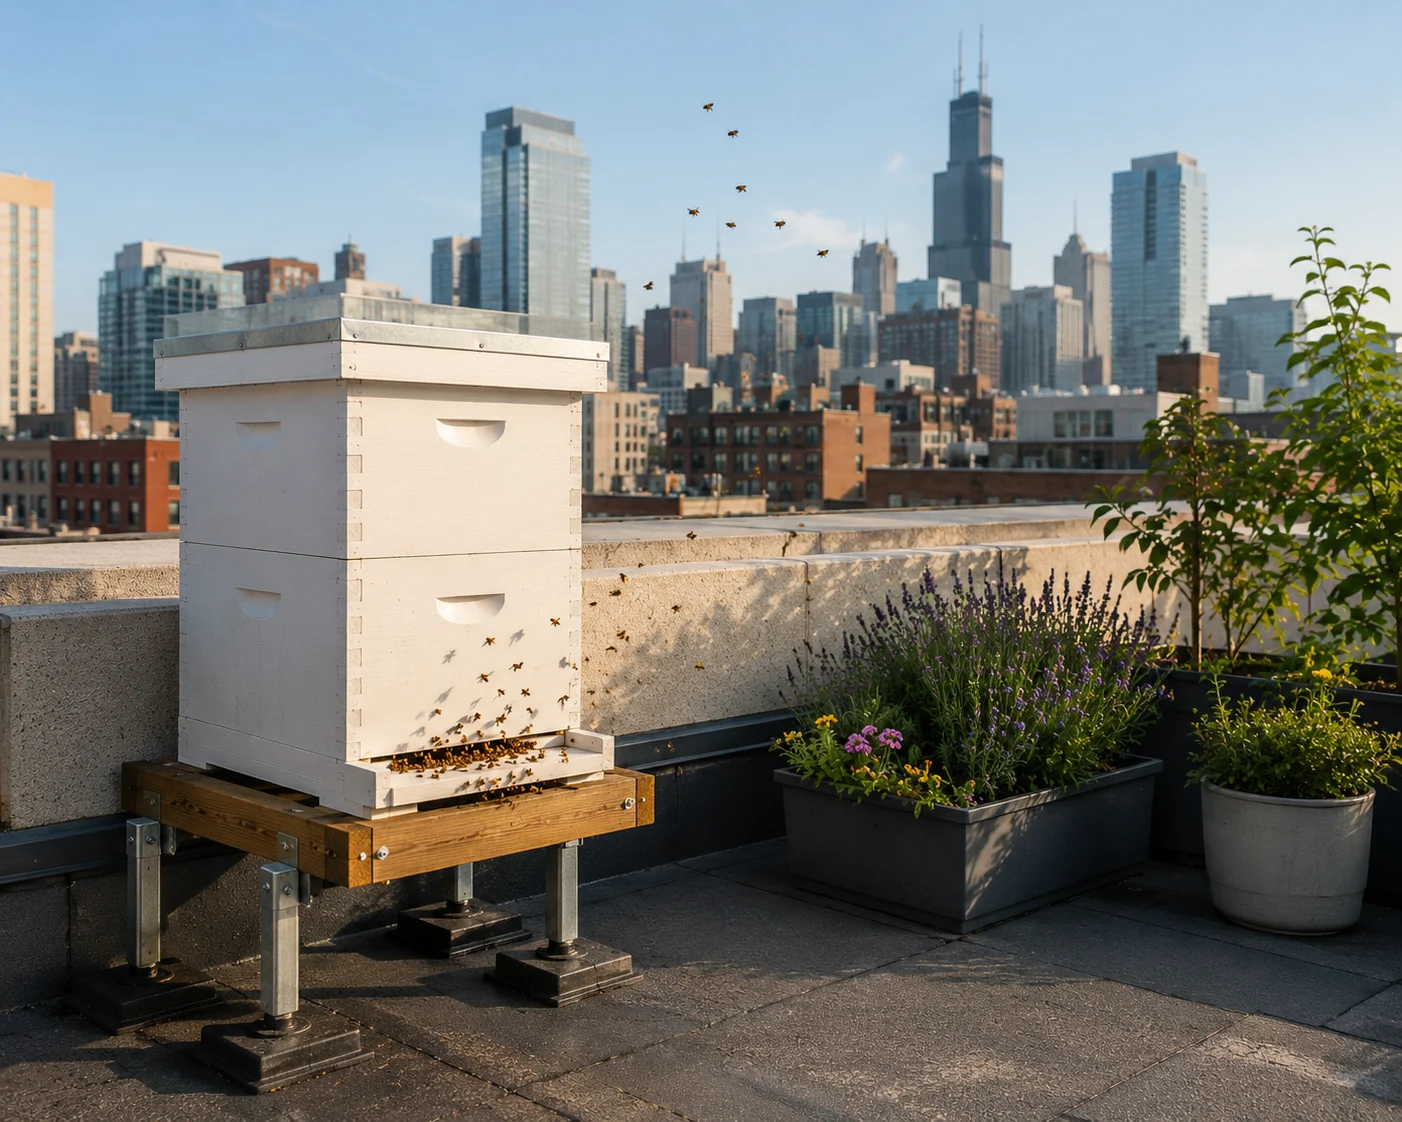
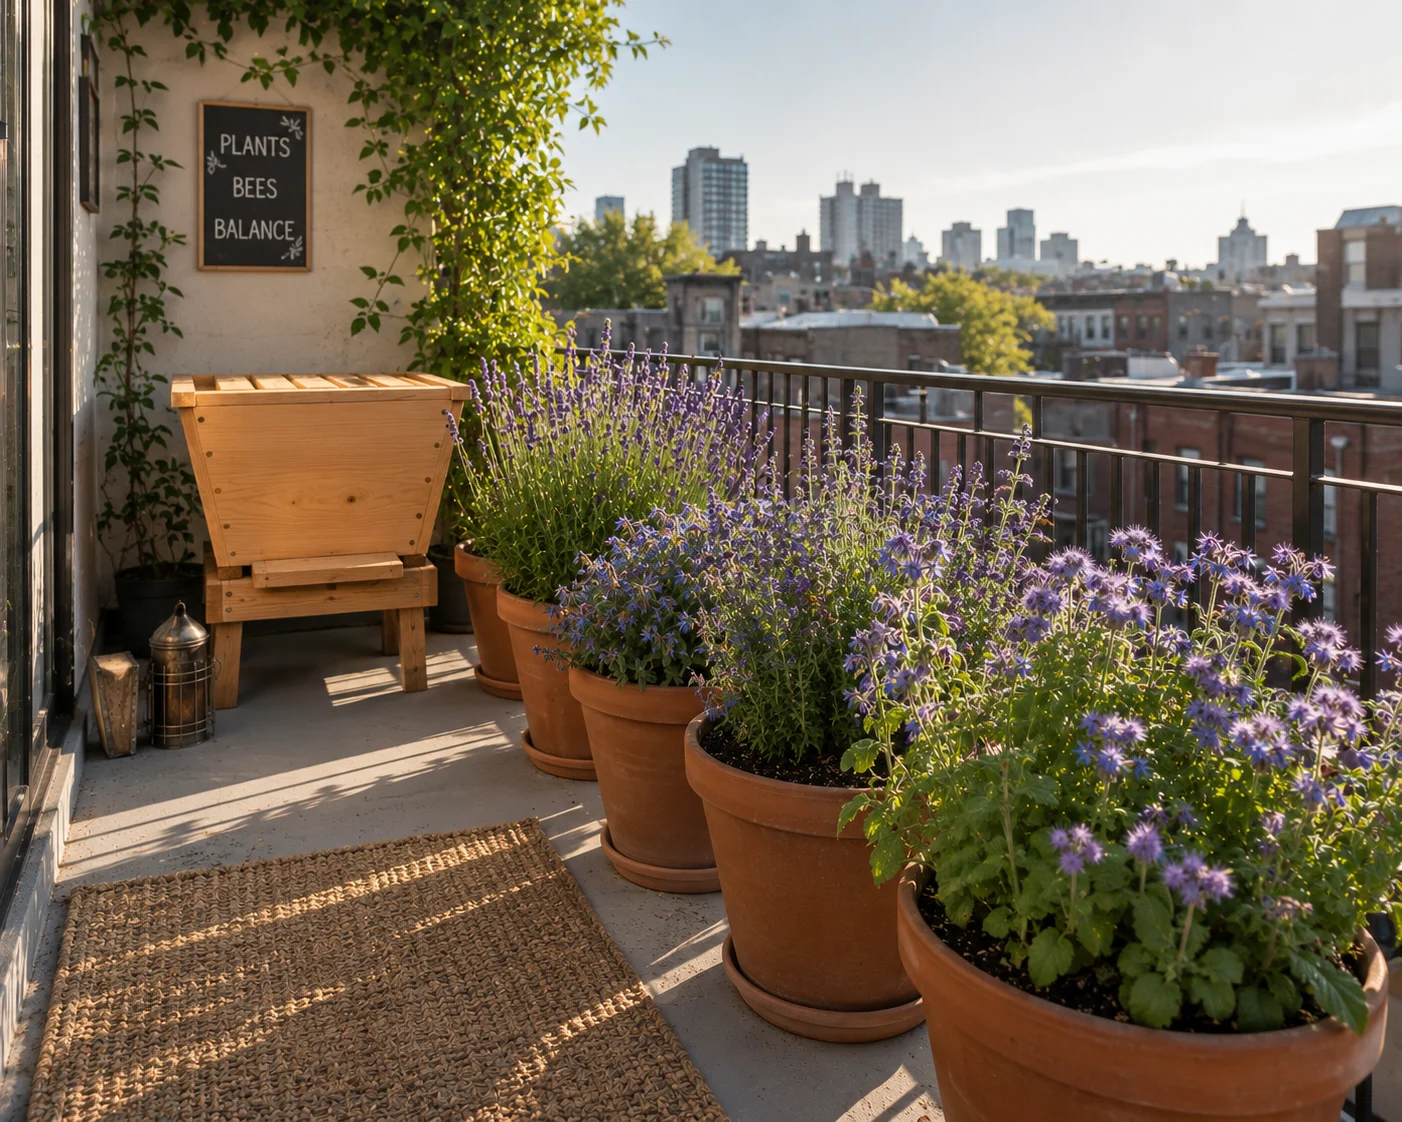
Balcony and Rooftop Placement
A balcony or rooftop installation follows the same orientation principles but adds specific considerations. Weight is the first: a fully populated 8-frame Langstroth with two full honey supers weighs 150–200 pounds. Verify your balcony or roof’s load rating before installation — a structural engineer assessment costs far less than repairing a collapsed balcony. Stability is the second: hives on elevated structures are exposed to wind from all sides rather than just the prevailing direction. Secure the hive to a wall bracket or a weighted platform stand, and ensure it cannot be knocked or blown over. Water access becomes more logistically complex on a balcony — you’ll need to carry water up rather than relying on a ground-level source, which means planning for a larger capacity container and a more consistent refill schedule during summer.
The Neighbor Conversation: How to Do It Right
This section could save your entire beekeeping operation. In a small-space urban context, neighbor relations are not a soft consideration — they are a hard practical constraint that determines whether you get to keep bees at all.
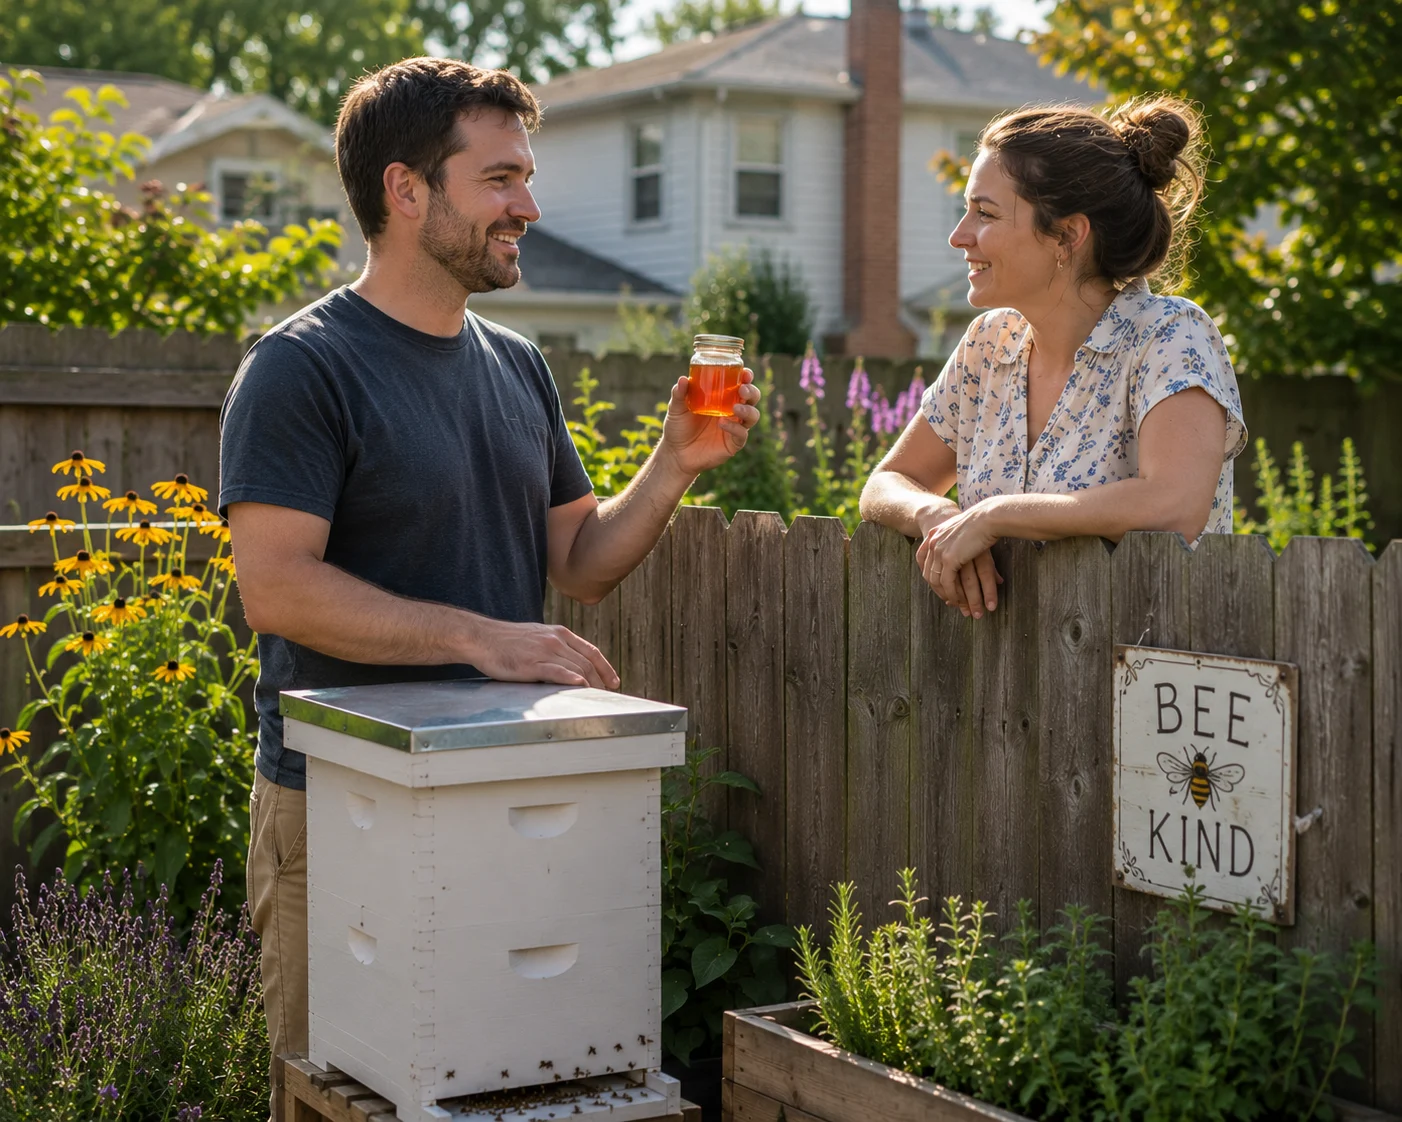
The single most important thing to understand about neighbor communication is the timing: tell your neighbors before you install the hive, not after they notice the bees. A proactive conversation with a jar of honey and a clear explanation positions you as a considerate neighbor who is doing something interesting and positive. A reactive conversation after a neighbor has already been alarmed by an unexpected swarm of insects in their yard positions you as someone who has caused a problem. The information you share is identical in both conversations. The relationship outcome is completely different.
What to say and how to say it:
Lead with the benefits and the facts, not with reassurances. “I’m planning to keep a beehive in my backyard. Honeybees are incredibly gentle — foragers are almost never aggressive away from the hive, and mine will be flying over the fence rather than at face height. Most of my neighbors won’t notice them at all. I’ve also planted a garden that gives them most of what they need close by, so they’ll rarely need to forage into your yard.” This is more persuasive than “don’t worry, they won’t sting you” because it explains the mechanism rather than just making a promise.
Bring honey. Genuinely. A small jar of local honey is not a bribe — it’s a tangible demonstration of what this operation produces and what it means for the neighborhood ecosystem. It also gives the conversation a physical anchor that most people respond to positively.
Offer a hive visit. Not everyone will want to come and look, but offering shows confidence and openness. A neighbor who has stood three feet from a calm hive and watched bees going about their business is a neighbor who will never call animal control about your bees. A neighbor who has only ever imagined what a beehive is like will always imagine something more threatening than reality.
Handle concerns directly. If a neighbor mentions a bee allergy, take it seriously — offer to consult your local beekeeping association about appropriate setback distances for households with severe allergic members, and consider additional mitigation measures like a taller fly-up barrier or a gentler Italian bee strain. Acknowledging the concern and proposing a concrete response is far more effective than minimizing it.
Forage Planning for Urban Small Spaces: Making Every Square Foot Count
One of the genuine advantages of urban small-space beekeeping that rarely gets discussed is the extraordinary richness of urban foraging landscapes. A honeybee colony based in a dense residential neighborhood has access to hundreds of private gardens, street trees, park plantings, community gardens, and ornamental plantings within its three-mile foraging radius — a diversity of nectar sources that often rivals or exceeds what a rural colony finds in an agricultural landscape dominated by a single crop.
That said, what you plant in your own small space still matters. The area immediately surrounding the hive — within 200 feet — is the easiest and cheapest foraging territory your bees will ever work. A well-planted small garden or a container collection on a balcony can provide meaningful supplemental forage that reduces the colony’s energetic cost of foraging, supports the specific gap months when the broader urban landscape goes quiet, and — in the case of medicinal herbs planted close to the hive — actively supports colony immune function.
For a yard under 50m², the most efficient forage investment is a mix of high-nectar-density plants in containers or compact raised beds. The non-negotiables for a small-space US urban garden:
Lavender (compact varieties: ‘Hidcote’, ‘Munstead’) — drought tolerant, long-blooming June to August, highest bee visit rate of any single plant in multiple US studies. In a container on a balcony or in a raised bed, three to five plants in a cluster create a meaningful local forage patch.
Borage — self-seeds freely, takes up minimal space, flowers June to October, replenishes nectar every few minutes. Direct-sow in April in any available ground or large container. One of the most productive annual bee plants available in North American gardens.
Catmint (‘Walker’s Low’) — compact, spreads to fill a 2-foot circle, blooms May to July then again in September if cut back, extremely high bee activity. Ideal for container edges or front border planting along a fence.
Phacelia — annual, direct-sow in March or April, flowers in 8–10 weeks. Consistently rated among the top three bee plants in North American trials. Takes up minimal space and can be succession-sown every 4 weeks for continuous bloom.
Lemon balm — grows happily in a large container, produces small white flowers that bees work intensively in summer, and has a centuries-old tradition of use in beekeeping. Rubbing fresh lemon balm leaves on a new hive body is a traditional method of encouraging colonization that has real chemical basis — the plant produces geraniol and citral, which are components of the Nasonov pheromone bees use to mark their home.
For a balcony setup with no ground planting, a collection of five to eight large containers (12 inches or larger) planted with the above species creates a surprisingly productive forage zone. Position containers in the sunniest spot on the balcony — all of these plants need full sun to produce nectar at meaningful rates. The container garden also serves a secondary purpose: it gives the hive visual context for foragers orienting on return flights, reducing the brief disorientation that urban bees sometimes experience in featureless rooftop environments.
Managing a Small-Space Colony: What’s Different
The fundamental biology of a honeybee colony doesn’t change based on the size of the yard it sits in. What changes in a small-space context is the management emphasis — the specific decisions and interventions that matter most when space, neighbor proximity, and urban legal context are all active constraints.
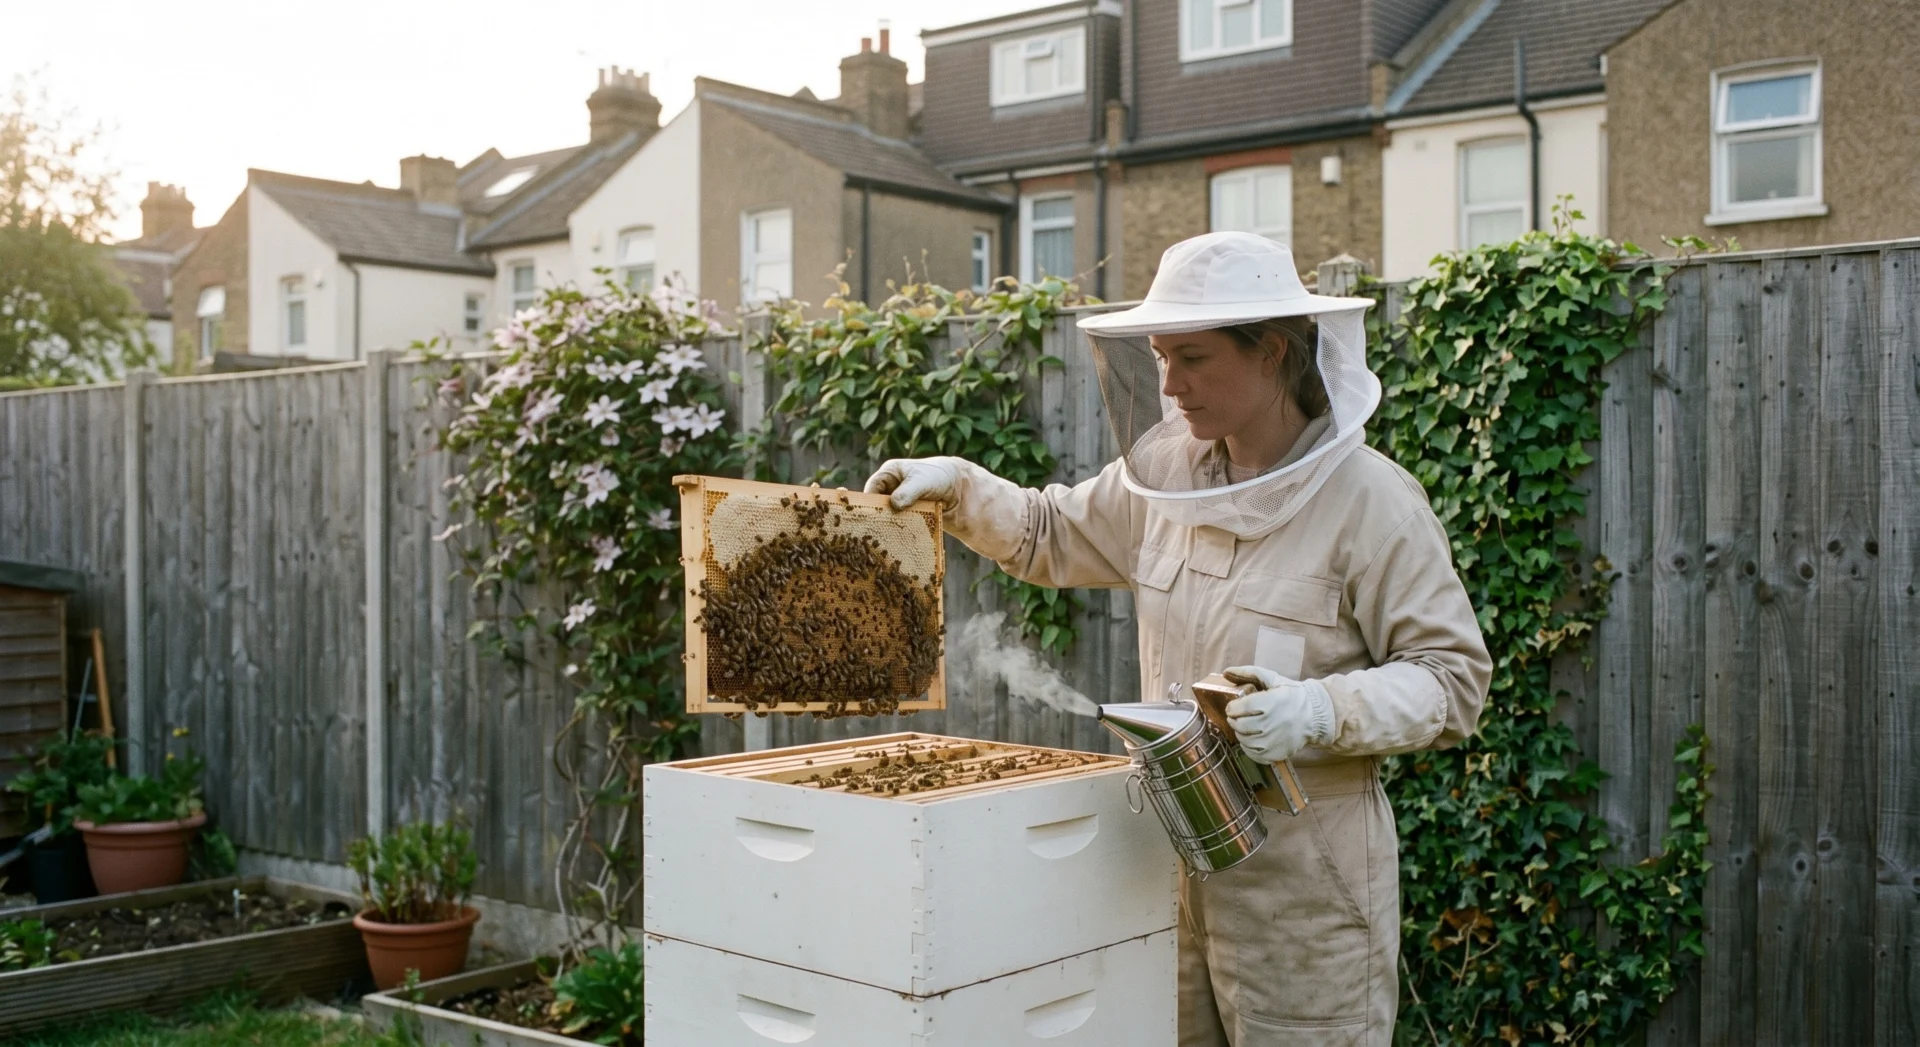
Swarm prevention is non-negotiable in a small urban space. A swarm from a rural hive landing in a nearby tree is a manageable inconvenience. A swarm from an urban hive landing on a neighbor’s car, mailbox, or front porch is a relationship-ending event that may also trigger a municipal complaint and the loss of your beekeeping permit. Swarm prevention in a small-space apiary means inspecting every 7–9 days from April through June, adding space before the colony needs it rather than after, and responding immediately if queen cells appear. We’ve covered the complete swarm management protocol — including the artificial swarm technique — in the full swarm season guide written specifically for beekeepers who cannot afford for a swarm to land in the wrong place.
Gentle genetics matter more in a small space. A defensive colony in a rural apiary is an inconvenience. The same colony in a 400-square-foot urban yard is a serious problem. When sourcing your first package or nucleus colony, specify Italian bees — the dominant commercial strain in the US and consistently the most docile. Avoid Carniolan bees if you are in a very small or densely populated space — they are excellent bees but build up to large populations very rapidly in spring, which increases both swarm pressure and defensive behavior during peak season. If your colony develops unexpectedly defensive tendencies after its first season (this can happen through natural drone mating), requeening with a known gentle Italian queen is the cleanest solution.
Inspect in the evening or early morning. In a small urban yard, the timing of your inspections matters for neighbor relations. A full inspection at 2pm on a Sunday afternoon, when your neighbors are likely to be in their gardens, sends agitated bees into a shared outdoor space at peak social hours. An inspection at 7am on a weekday or at dusk on a weekday evening — when neighbors are typically inside — causes zero disruption and keeps your relationship with the neighborhood positive.
Robbing prevention is a specific small-space concern. In a dense urban environment where multiple beekeepers may be operating within the same foraging radius, robbing behavior during summer dearth periods can be intense. Keep your entrance reduced to 3–4 inches during July and August, never leave uncapped honey or sticky equipment exposed outside the hive, and be especially vigilant for the erratic, fast-moving flight pattern that distinguishes robber bees from regular foragers. The July–August dearth and its effect on colony behavior is covered in full in the seasonal nectar calendar and how to manage the summer dearth period for urban colonies.
Hive weight management in elevated installations. If your hive is on a balcony or rooftop, the mechanics of adding and removing heavy supers require more planning than at ground level. A full 8-frame honey super weighs 40–50 pounds — manageable at ground level, significantly more challenging when you’re carrying it up stairs or through a building. Consider installing a pulley system for rooftop installations, using medium-depth supers (which weigh 25–30 pounds full) rather than deep supers, and harvesting more frequently rather than waiting for a maximum-load super before extracting.
The Small-Space Beekeeping Setup Checklist
Before you order your first package of bees, run through this complete checklist. Every item should be confirmed before installation day.
Legal and administrative: Verify city and county ordinances permit residential beekeeping at your address. Check HOA covenants if applicable. Register hive with state department of agriculture. Confirm setback requirements and whether a fly-up barrier provides alternative compliance. Join your local beekeeping association — they provide legal support, mentorship, and swarm collection networks that are invaluable in an urban context.
Site preparation: Choose final hive position — southeast orientation, afternoon shade. Install fly-up barrier if needed — minimum 6 feet tall, 3 feet wider than hive on each side. Install hive stand at 40–50cm height on stable, level surface. Establish water source within 30 feet — pebbles, partial shade, established before bees arrive. Plant or arrange container forage — minimum three to five species, positioned in full sun.
Equipment: 8-frame Langstroth or top-bar hive assembled and painted white or pale color. Screened bottom board installed. Entrance reducer set to smallest opening for first two weeks. Hive tool, smoker, veil, and gloves sourced before package arrival. Read the complete apiary layout and equipment guide covering everything from stand height to hive color and orientation before finalizing your setup.
Community: Neighbor conversations completed — ideally two to three neighbors on each side informed. Honey jars ready for gifting. Local emergency contact identified — a beekeeper you can call if a swarm occurs who can respond within the hour.
Conclusion: Small Space, Real Bees, Real Honey
The 50m² threshold is not a limitation. It is a design challenge — and one that hundreds of thousands of urban beekeepers across the United States have already solved, in apartments, rowhouses, city lots, rooftops, and community gardens from Brooklyn to Portland to New Orleans.
What small-space beekeeping requires is not more space. It requires more intentionality — clearer thinking about placement, flight paths, neighbor relations, forage planning, and colony management than a rural beekeeper with unlimited room can afford to be casual about. That intentionality, applied consistently, produces colonies that are better managed, better integrated into their communities, and — more often than not — more productive per hive than their rural counterparts foraging a monoculture landscape.
The key takeaways: verify your legal situation before anything else. Choose an 8-frame Langstroth or top-bar hive matched to your specific space. Install a fly-up barrier before the bees arrive. Have the neighbor conversation first, with honey. Plant for the gap months your city’s landscape leaves empty. Manage for swarm prevention above all else.
Your yard is big enough. Your city is rich enough. The bees will show you what’s possible. 🐝
Keep Reading 🐝
These posts give you the deeper knowledge behind small-space beekeeping success:
- 🏡 The complete apiary layout guide — every positioning principle that applies equally to small urban yards — The foundational layout post for any apiary, small or large.
- 🌿 How to design a container or compact garden bed that bees can actually find and return to reliably — Small-space forage planning in full detail.
- 🌡️How to keep a small urban hive cool in summer — especially important for dark-colored rooftop installations — Urban hives in direct sun need this guide before July.
Small space. Real bees. Real honey. Let’s go. 🍯