Most beekeepers spend a lot of time thinking about what goes on inside their hives. They read about varroa management, queen performance, swarm prevention, and honey extraction. What far fewer beekeepers think carefully about is the ground their hives sit on — the orientation, position, surroundings, and site conditions that determine how efficiently every single colony in their apiary can function.
This is a costly oversight. Apiary layout is not a cosmetic decision. Where you place your hives, which direction they face, what surrounds them, how close together they are, and what access they have to water and windbreak — all of these factors directly influence foraging efficiency, colony health, honey yield, and the long-term sustainability of your apiary. A well-designed apiary doesn’t just look tidy. It works harder, loses fewer bees to drift and robbing, survives winter better, and produces measurably more honey per hive than a poorly positioned one.
The good news is that most apiary layout mistakes are fixable. Some can be corrected in an afternoon. Others require a seasonal move or a small infrastructure investment. None of them require starting over from scratch.
This post covers the seven most common and most costly apiary layout mistakes, explains exactly why each one hurts your bees and your harvest, and gives you a clear, practical fix for every single one. Each mistake comes with a before/after picture so you can see immediately whether it applies to your setup.
Mistake 1: Hives Facing the Wrong Direction
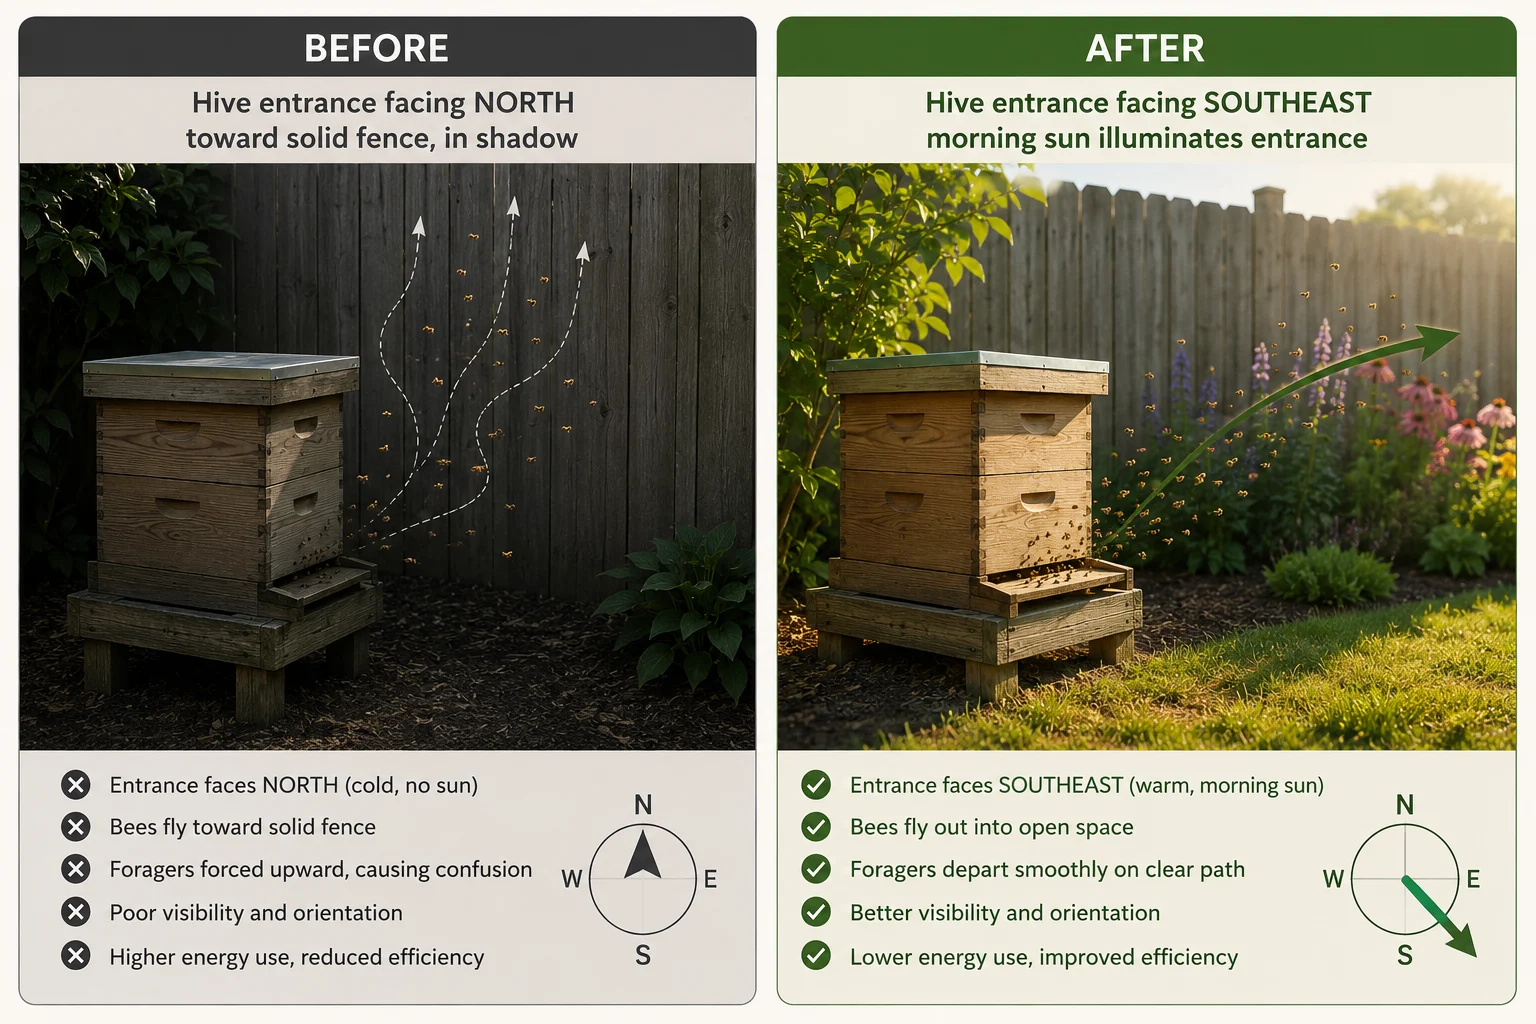
The mistake: Hives pointing north, west, or directly into the prevailing wind. Sometimes facing a wall or fence so close that foragers have to climb vertically before they can navigate horizontally.
Why it costs you honey: Hive orientation directly affects two things — morning warm-up time and foraging start time. A hive entrance facing south or southeast catches the first low-angle morning sun directly on the landing board and the front of the hive. This warmth raises the internal temperature of the colony, stimulates the queen’s laying activity, and — critically — gets foragers out of the hive and working earlier in the day. In peak season, a southeast-facing hive may begin sending foragers into the field 30–45 minutes earlier than a north-facing hive in the same apiary, every single day. Over a six-week flow, that is a significant accumulation of foraging hours and a measurable difference in honey stores.
A hive facing directly into prevailing wind has a secondary problem: foragers returning loaded with nectar or pollen are fighting a headwind on the final approach to the landing board. This is energetically expensive and in strong winds can reduce return rates on the most challenging flying days — often the gusty spring days when the first major nectar flows are in progress.
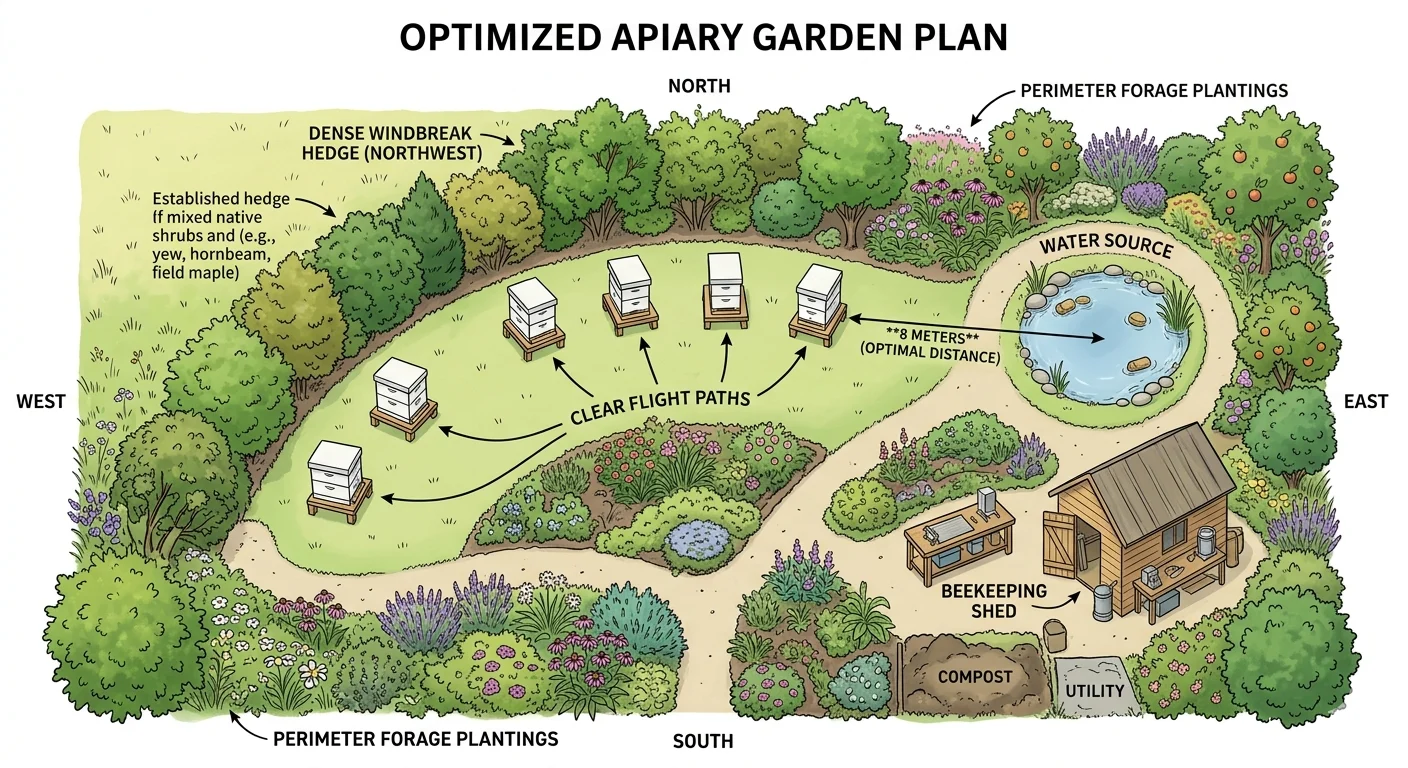
The fix: Reorient hives to face between southeast and south. In the Northern Hemisphere this means the entrance faces roughly toward the midpoint between where the sun rises and where it sits at midday. If your prevailing wind is from the southwest (as it is across most of the UK and much of the eastern US), a southeast-facing entrance takes the morning sun while keeping the entrance out of the worst wind. If complete reorientation isn’t possible, a partial windbreak placed to the southwest of the entrance achieves a similar effect.
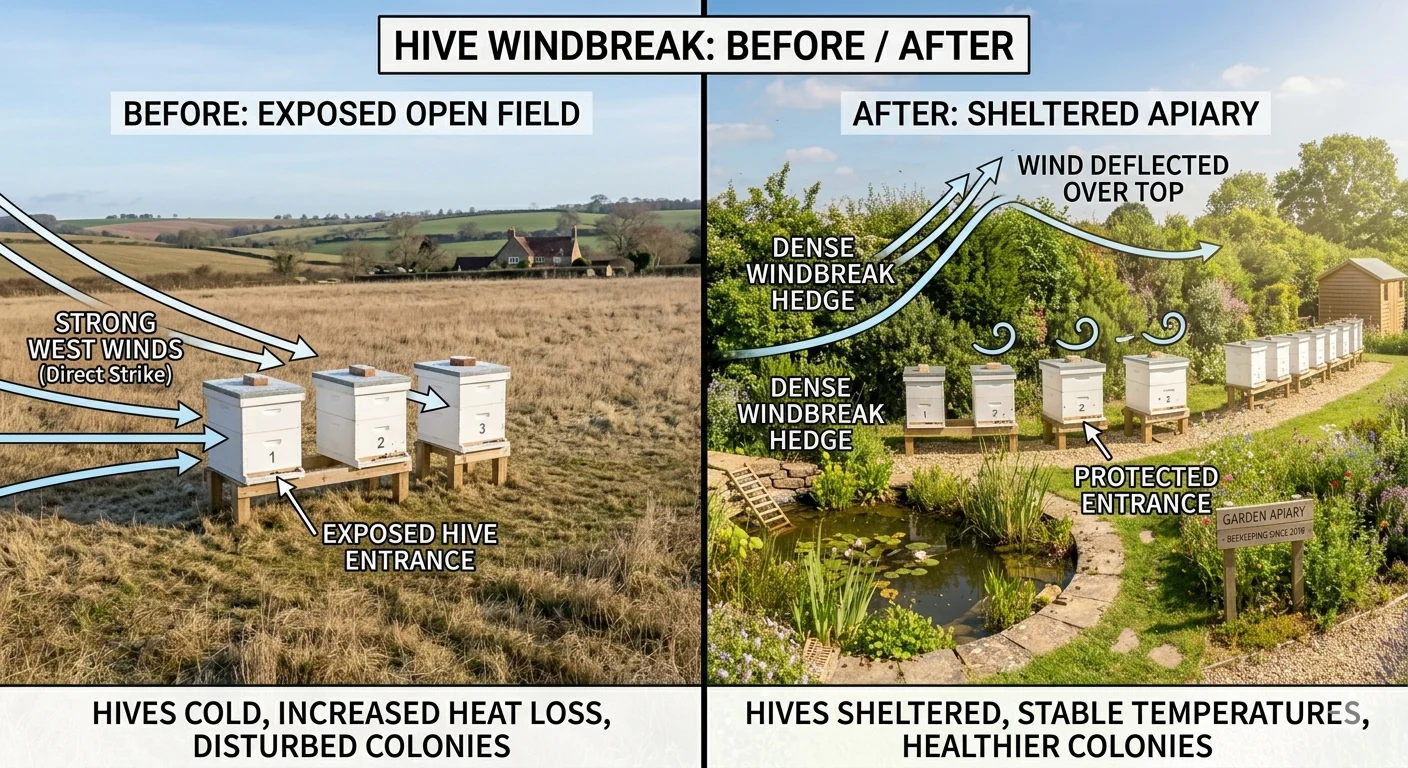
Mistake 2: No Windbreak — Exposed Hives in Open Ground
The mistake: Hives positioned in the middle of an open garden, field, or exposed hillside with no shelter from prevailing winds in any direction.
Why it costs you honey: Wind affects colony productivity in three distinct ways that compound each other. First, a cold wind strips heat from the hive exterior faster than the colony can replace it through metabolic activity — particularly damaging in spring when colonies are trying to expand, and in autumn when winter bees are being raised. Every calorie burned maintaining core temperature is a calorie not converted into honey. Second, strong winds directly reduce foraging activity. Bees are small and aerodynamically vulnerable — a sustained 20mph wind grounds a meaningful percentage of the foraging workforce. Third, wind-exposed hives in wet climates face increased moisture infiltration through the entrance, raising internal humidity and creating conditions that favour nosema and other fungal pathogens.
Research published by the Scottish Beekeepers Association has consistently shown that sheltered apiaries in comparable locations outperform exposed ones in honey production across all seasons, with the greatest differential in spring and autumn — the seasons that determine how fast a colony builds up and how well it survives winter.
The fix: Establish a windbreak to the north and west of the apiary — the direction of the coldest and most damaging winds in the Northern Hemisphere. The ideal windbreak is a mixed native hedge — hawthorn, blackthorn, hazel, and field maple are all excellent — positioned 3–5 metres behind the hives. This distance matters: a windbreak that’s too close creates turbulence rather than shelter, which is worse than no windbreak at all. The hedge should be at least 1.5 metres taller than the hives and extend at least 3 metres beyond the apiary on both sides to prevent wind wrapping around the ends.
If a permanent hedge isn’t possible, a temporary windbreak of woven willow hurdles, close-boarded fencing, or a dense evergreen screen achieves similar protection immediately. A windbreak also doubles as a navigation landmark and a visual barrier that encourages bees to gain height quickly on departure — keeping them out of conflict with garden users below. This principle is covered in depth in the complete guide to apiary siting, hive positioning, and flight path management .
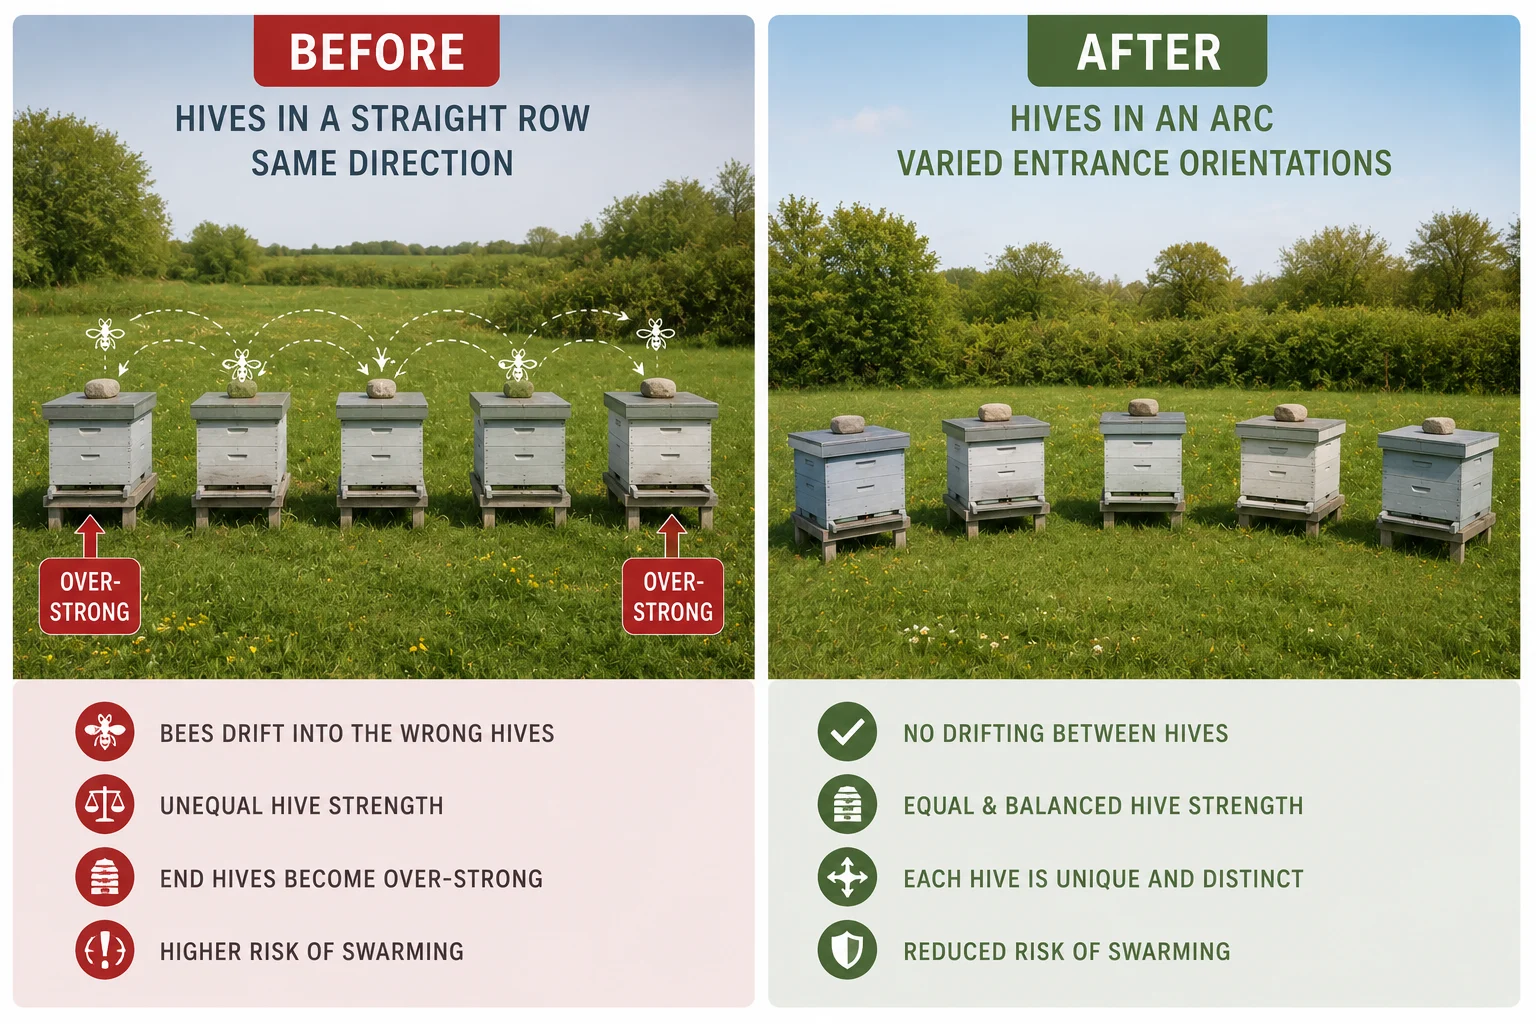
Mistake 3: Hives Too Close Together — Drift and Robbing
The mistake: Hives positioned less than 1 metre apart, often in a straight row all facing the same direction, with entrances in a line.
Why it costs you honey: Hive spacing and arrangement directly determines how much bee drift occurs in your apiary. Drift is the phenomenon of foraging bees returning from the field and entering the wrong hive — mistaking a neighbouring colony’s entrance for their own. In a straight-row apiary with hives spaced 60cm apart and all facing the same direction, drift rates of 20–30% are not unusual. This means up to a third of your foragers may be depositing their nectar and pollen load in the wrong colony — systematically enriching end-hives (which foragers tend toward when confused) at the expense of middle hives.
The consequences compound over a season: middle colonies in a straight row consistently underperform end colonies, not because of any biological difference between the colonies, but because of their geographical disadvantage. End colonies may appear artificially strong, leading beekeepers to erroneously attribute their performance to genetics rather than position.
Beyond drift, closely spaced hives in a straight row dramatically increase robbing risk. When a nectar dearth hits — which it does every year in July and August across most temperate regions — hungry foragers from strong colonies will investigate any weakness in neighbouring hives. In a close-packed straight row, the flight paths of adjacent colonies overlap, making it trivially easy for robber bees to find and exploit a weak colony’s entrance.
The fix: Space hives a minimum of 1 metre apart entrance-to-entrance. Arrange them in a gentle arc, a staggered double row, or — ideally — an irregular cluster where each entrance faces a slightly different direction. Even rotating adjacent hives 15–20 degrees from each other dramatically reduces drift rates by giving each colony a visually distinct landmark profile. Differentiate hives visually: different coloured entrance boards, different roof colours, or a distinctive marker near each entrance (a stone, a plant, a painted symbol) significantly helps foragers identify their correct home.
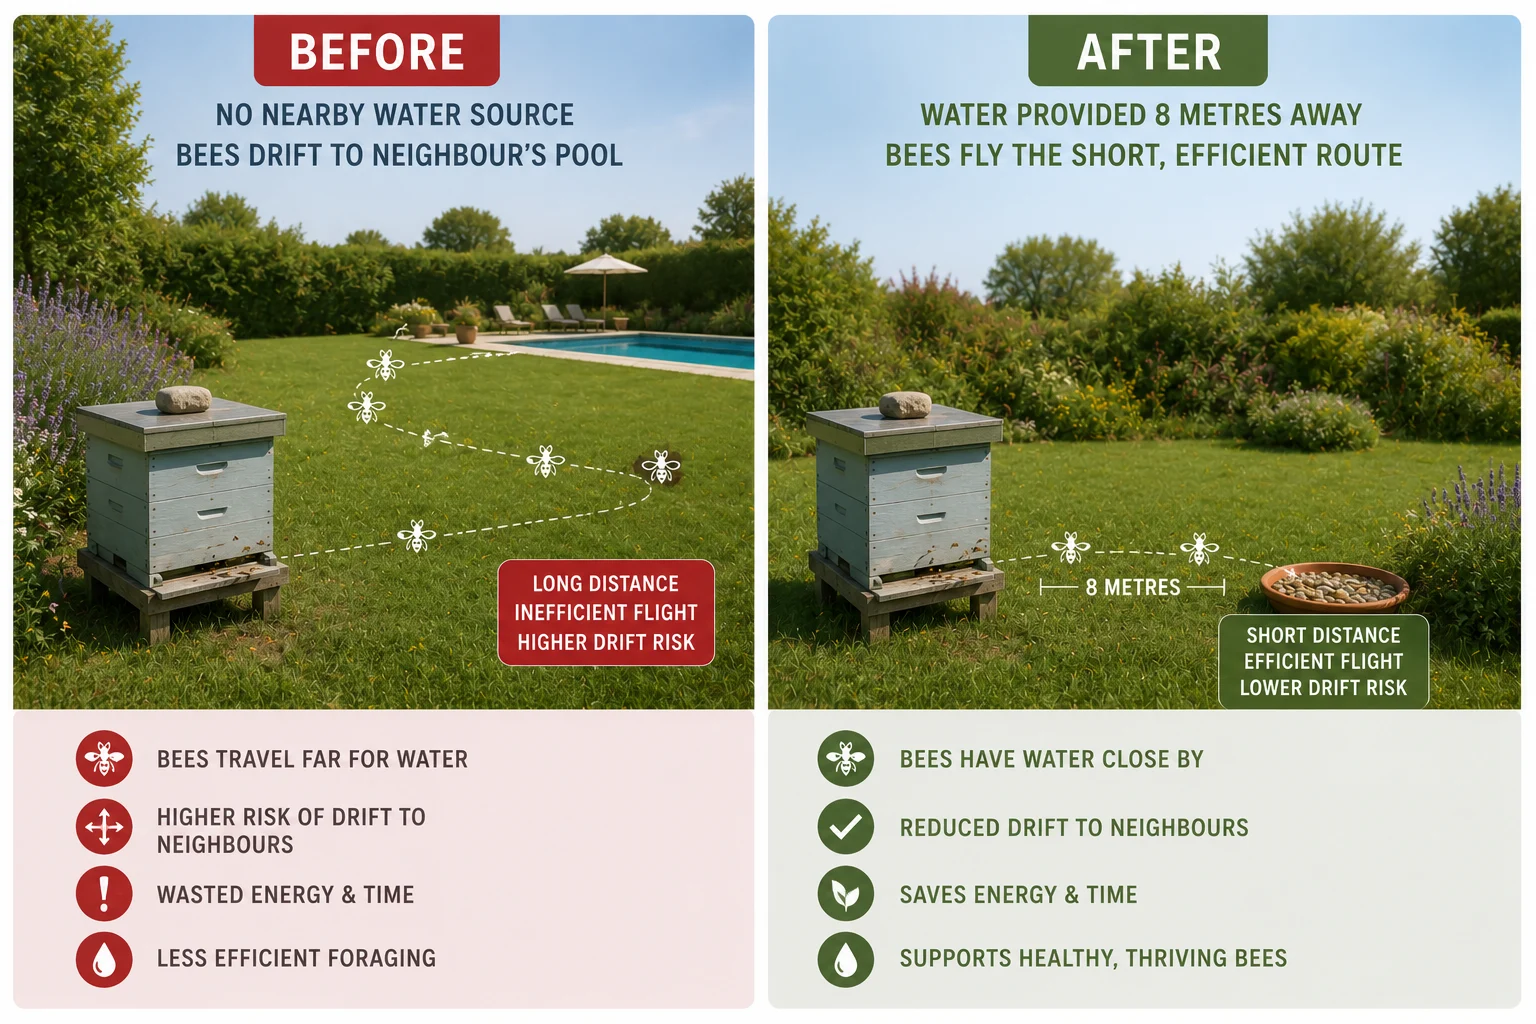
Mistake 4: No Permanent Water Source Within the Apiary
The mistake: No water source provided near the hives, or a water source established too late in the season after bees have already adopted inconvenient alternatives (neighbours’ pools, gutters, garden water features).
Why it costs you honey: Water is not optional for a honeybee colony. It is a critical year-round resource that serves three essential functions: diluting crystallized honey stores to make them consumable, cooling the hive through evaporative cooling during summer heat, and supporting brood development and adult bee physiology. During a heatwave, a colony may deploy hundreds of dedicated water foragers making continuous trips throughout the day — and every water foraging trip is a foraging trip not spent collecting nectar.
The energy cost of water foraging is identical to nectar foraging. The return is zero calories. A colony with no nearby water source is running a permanently elevated proportion of its foraging workforce on zero-return trips, reducing the effective nectar-collecting capacity of the hive through the entire summer — which is exactly when the most valuable flows are occurring.
The secondary problem — bees adopting a neighbour’s water feature, swimming pool, or leaking tap as their primary water source — is almost impossible to reverse once established. Bees are intensely loyal to known water sources. Moving the source even a few metres after bees have committed to it causes confusion and loss. The only reliable solution is to establish your own water source before the bees find an alternative, ideally in early spring before the first warm days bring water foragers into action.
The fix: Install a permanent water source within 10 metres of the hive entrance before the end of March. The source needs: sufficient capacity to last several days without refilling, a landing surface that prevents drowning (pebbles, corks, wooden skewers, or a piece of natural wood float), partial shade to reduce evaporation and keep the water cool, and a stable position — once placed, do not move it. A terracotta saucer with pebbles and a slow drip from a nearby tap is ideal. A large, shallow trough with a float landing surface works for a larger apiary. During heatwaves, refresh the water daily and consider a second source positioned slightly further from the hives to distribute the load and reduce congestion at a single source.
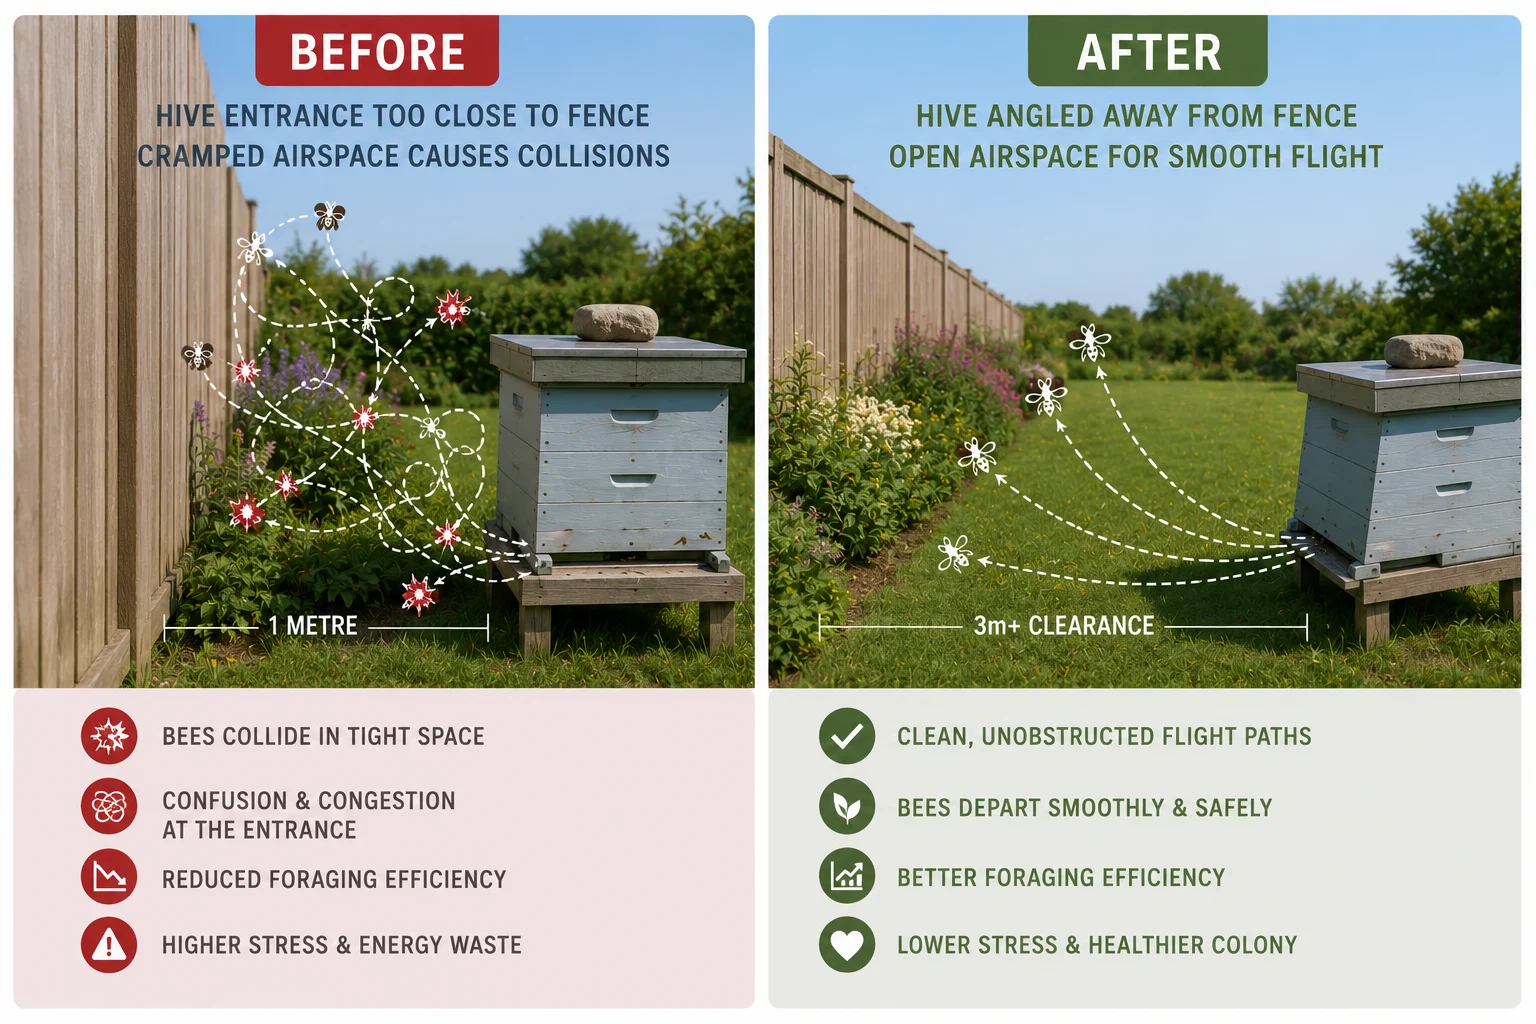
Mistake 5: Entrances Too Close to Fences, Walls, or Obstacles
The mistake: Hive entrances positioned 1–2 metres or less from a solid vertical obstacle — a garden fence, a wall, dense hedging — directly in line with the flight path.
Why it costs you honey: When a foraging bee departs a hive entrance, she needs a clear horizontal runway to reach foraging altitude efficiently. A solid obstacle directly in the flight path forces her to climb vertically before she can navigate horizontally toward forage — an aerodynamically demanding manoeuvre that costs significantly more energy than a clean horizontal departure, particularly when she returns loaded with a full nectar crop.
More significantly, a solid obstacle directly in front of the hive entrance transforms the flight path into a conflict zone. Returning foragers, descending on their final approach, and departing foragers, climbing to clear the obstacle, are using the same narrow airspace simultaneously. The result is mid-air collision, disorientation, and lost bees — particularly in the heavy traffic conditions of a peak summer flow when the approach to the entrance can be crowded with thousands of simultaneous movements.
There is also a practical safety dimension: a hive with its entrance 1.5 metres from a garden fence sends all of its foragers over that fence immediately on departure — directly into the airspace of anyone using the garden on the other side. This is the source of a significant proportion of garden-related bee incidents, and it is entirely a function of poor hive positioning rather than colony aggression.
The fix: Position hive entrances a minimum of 3 metres from any solid vertical obstacle in the direct flight path. If 3 metres is not achievable in your garden, angle the hive so the entrance faces along rather than perpendicular to the nearest fence line, and use a low hedge or planting immediately in front of the entrance to force bees to gain height quickly — a different mechanism from a direct obstacle, because the bees are choosing to climb rather than being forced to. For gardens where space genuinely prevents a 3-metre clearance, consider a 1.8-metre solid screen positioned 1 metre directly in front of the entrance — this forces bees over the screen and into the air above garden-user height before they can fly horizontally, effectively solving the safety and efficiency problem simultaneously.
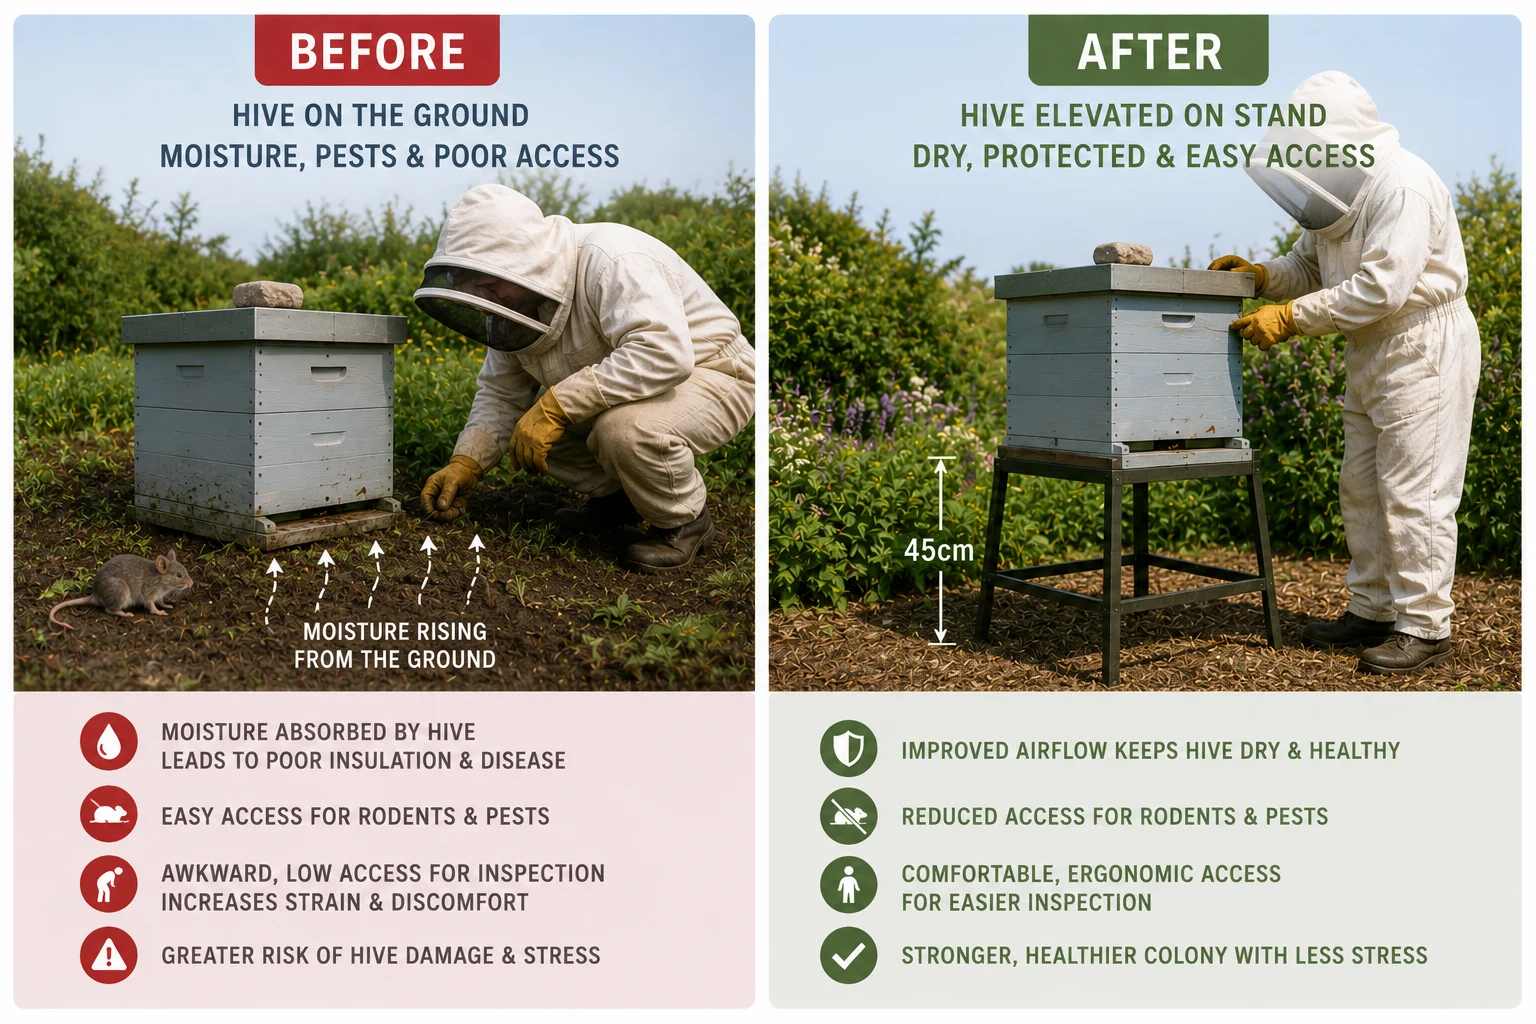
Mistake 6: All Hives on the Ground — No Stands
The mistake: Hives placed directly on the soil, on paving slabs, or on low bricks that raise them only 5–10cm off the ground.
Why it costs you honey: Ground-level hives face a cluster of compounding problems that individually seem minor but together produce a measurable drag on colony performance. Moisture is the most serious. Soil moisture evaporates upward continuously, and a hive sitting directly on soil absorbs ground dampness through its floor — raising internal humidity, promoting mould growth on comb surfaces, and creating conditions that stress bees physiologically throughout winter. The floor of a ground-level hive in a typical UK or northern European garden will show mould and rot within two to three seasons.
Cold air pools at ground level. On clear winter nights, the temperature at ground level can be 2–4°C colder than at 45cm — a difference that meaningfully increases the metabolic load on a wintering cluster trying to maintain core temperature. Small colonies that might survive on a stand often fail at ground level in cold winters, not from disease or starvation but from the cumulative energetic cost of managing a colder environment.
Ground-level hives are also dramatically more vulnerable to pest access. Mice, which are one of the most destructive winter pests in any temperate apiary, enter hives at ground level far more easily than hives on stands — a ground-level entrance can be reached from any angle, while a hive on a stand requires a mouse to climb. Slugs, ground beetles, and other invertebrates access ground-level hives readily and cause chronic low-level disturbance that stresses colonies disproportionately.
Finally — and this is the reason most beekeepers eventually appreciate most — a hive on a proper stand is dramatically easier to inspect. Working with the brood box at waist height rather than crouching over a ground-level hive reduces physical strain, improves inspection posture, and means you can work more carefully and thoroughly with every frame.
The fix: Place every hive on a stand that raises the floor of the hive to 40–50cm above ground level. Purpose-built metal hive stands are inexpensive and last decades. Treated timber stands work well. Concrete block stacks are cheap and perfectly functional. Whatever the material, ensure the stand is level side-to-side and tilted very slightly forward — 1–2 degrees — so that any rainwater that enters the hive drains out the entrance rather than pooling on the floor. Secure the stand so it cannot be knocked over by a curious animal or an accidental collision during inspection.
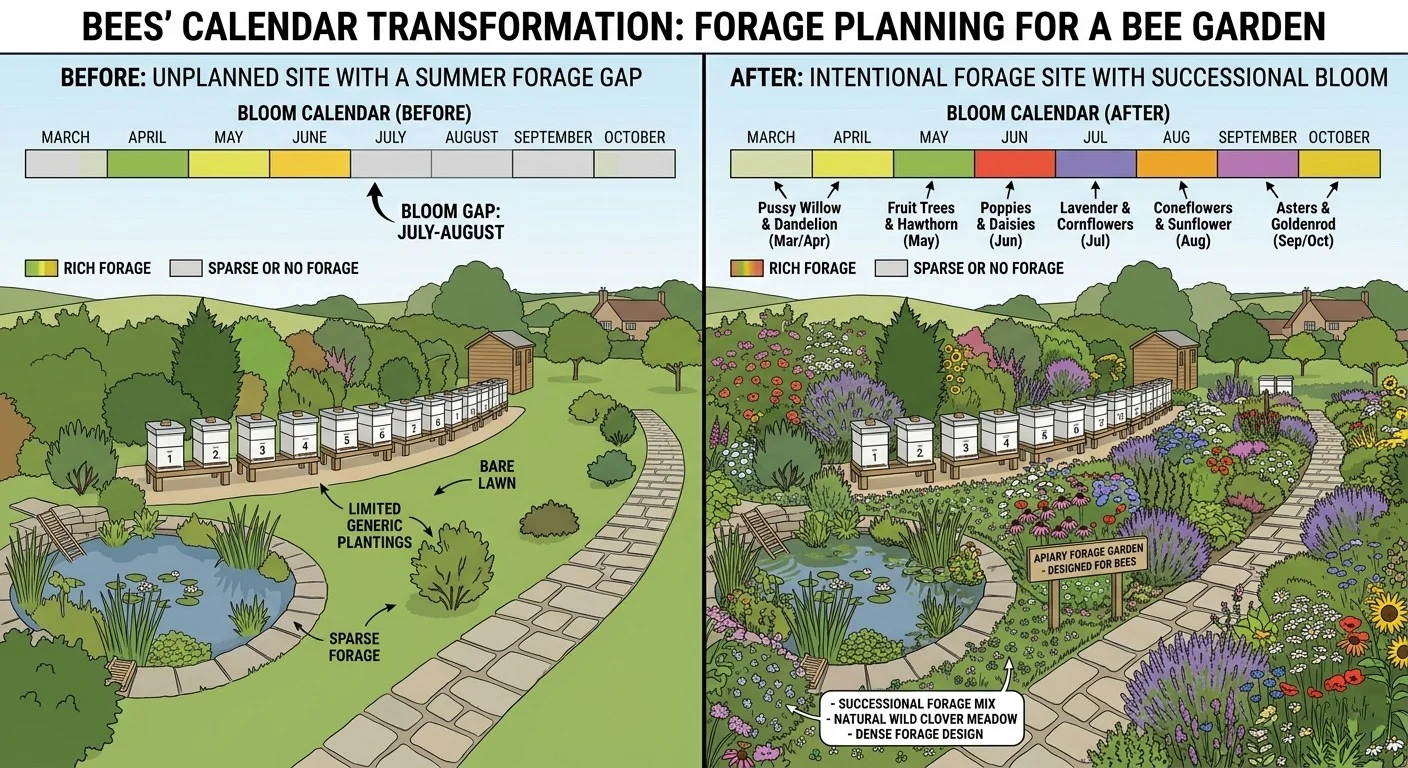
Mistake 7: No Forage Plan — Relying on Whatever Happens to Be Nearby
The mistake: Positioning the apiary without any consideration of what is actually flowering within the foraging radius throughout the season — and doing nothing to supplement it.
Why it costs you honey: This is the most invisible mistake on the list because it produces no single dramatic failure — just a quiet, persistent underperformance across the entire season that’s easy to attribute to vague factors like “it wasn’t a great year” or “my bees are just not that productive.”
A honeybee colony forages within a radius of roughly 3 miles (5km) from the hive. Everything flowering within that radius contributes to your harvest. Everything absent from that radius is a missed opportunity. In a suburban or semi-rural garden, the foraging radius will typically include a mix of garden plants, roadside verges, agricultural land, and parks. What it often lacks is continuity — a reliable sequence of overlapping nectar sources from March through October with no significant gap.
The July–August dearth — when spring and early summer flows have ended and late summer sources haven’t started — hits every apiary in a temperate climate to some degree. But apiaries surrounded by intentionally planned forage feel it far less severely than those relying entirely on whatever the surrounding landscape happens to provide. A beekeeper who has planted even a modest area of phacelia, borage, agastache, and late-season sedum within or adjacent to their garden has materially altered the foraging equation for their colonies in ways that show up directly in the honey jar.
The fix: Treat your apiary forage plan as seriously as your hive management. Begin with a simple audit: what is flowering within 500 metres of your hives in each month from March to October? Identify the gaps — the months where your audit turns up nothing significant — and plant directly for those gaps. Early spring is typically the weakest point: hellebore, pulmonaria, and early single-flowered crocus can be established in even a small garden and provide critical forage when queens are ramping up spring laying. The summer dearth gap is addressed with phacelia (sow in April for June flowers) and borage (sow in May for July flowers). Late season is covered by agastache, sedum, and — if you have wall or fence space — flowering ivy.
The medicinal herb layer of your apiary deserves particular attention here — plants like lemon balm, hyssop, and thyme planted immediately adjacent to the hives provide both forage and documented colony health benefits that go beyond simple nectar provision. We’ve covered the specific plants and their placement in the complete guide to medicinal herbs for apiary layouts and how they support colony immunity.
The Apiary Layout Audit: Run Through This Before Next Season
Now that you know what to look for, here is a complete self-audit you can run on your apiary in a single afternoon. Stand in your apiary and work through each question honestly. Every “no” is a fixable improvement.
Orientation: Are all hive entrances facing between southeast and south? Are any entrances pointing directly into the prevailing wind?
Windbreak: Is there a solid windbreak to the north and west of the apiary? Is it positioned 3–5 metres behind the hives rather than immediately adjacent?
Spacing: Are all hives at least 1 metre apart entrance-to-entrance? Are they arranged in an arc or staggered row rather than a straight line? Does each hive have a visually distinct landmark or colour to help foragers identify it?
Water: Is there a dedicated water source within 10 metres of the entrance, established before the end of March? Does it have landing surfaces? Is it in partial shade?
Clearance: Is there at least 3 metres of clear unobstructed airspace in front of every entrance? Are flight paths clear of garden users’ regular routes?
Stands: Are all hives elevated to 40–50cm on stable, level stands? Are they tilted slightly forward for drainage?
Forage: Can you name at least one flowering plant within 500 metres for every month from March to October? Have you identified and addressed any gap months with intentional planting?
If you answered no to three or more of these questions, your apiary layout is actively limiting your harvest. The fixes are not complex — most of them can be implemented over a single weekend or a single season’s planting — but their cumulative impact on colony performance and honey yield is substantial.
Conclusion: Your Apiary Works As Hard As You Design It To
The bees in your hives are working as hard as their biology allows. The question is whether the environment you’ve created around them is helping or hindering that work. An apiary that is oriented, sheltered, spaced, watered, elevated, and forage-planned correctly is an apiary where every colony performs closer to its biological ceiling. One that has accumulated several of the mistakes covered in this post is one where that ceiling is lower than it needs to be — not because of the bees, but because of the ground they stand on.
Pick the mistake that resonates most with your current setup. Fix it this weekend, or plan it for next season. Then work through the rest, one at a time. Each improvement compounds on the last, and the aggregate effect over two or three seasons of incremental apiary optimization is a genuinely different operation — healthier colonies, more foraging efficiency, better winter survival, and a heavier honey harvest.
The bees will show you the difference. They always do.
Keep Reading 🐝
These posts give you the deeper knowledge behind everything covered here:
- 🏡 The complete 10-point guide to designing a garden apiary from scratch — siting, layout, and everything in between — The foundational post this one builds on.
- 🌡️ How to protect your hive from overheating in summer — ventilation, shade, mesh floors, and water source setup — Water and ventilation errors cost you honey in summer specifically. This post covers both in full.
- 🐝 The swarm season guide — how apiary layout affects swarming impulse and what to do when it happens — Crowded, poorly spaced apiaries swarm more. Here’s the full guide to managing it.
Your apiary can always be better. Start with one fix. 🍯