Most gardeners plant the way most people shop — a little of this, a little of that, whatever catches the eye at the nursery. One lavender here, a clump of echinacea there, a single borage plant tucked in wherever there’s a gap. The garden looks varied and interesting. The bees, for the most part, ignore it.
This isn’t bad luck. It’s geometry.
A bee navigating your garden is not making aesthetic decisions. She is running a foraging algorithm — a continuous calculation of energy invested versus nectar and pollen returned. A single lavender plant in the corner of a mixed border doesn’t register as a destination worth communicating back to the hive. It’s a rest stop at best, an afterthought at worst. But twenty lavender plants massed together in a flowing drift? That’s a landmark. That’s a location worth dancing about. That’s a patch that gets visited, revisited, and communicated to every forager in a three-mile radius within hours of first discovery.
The Drift Method is the design principle that turns a pleasant garden into a working pollinator habitat — not by planting different things, but by planting what you already love in a fundamentally different way. It works for complete beginners who have never thought about garden design before. It works for experienced gardeners who can’t figure out why their carefully curated borders stay quiet. And it produces gardens that look more beautiful, more naturalistic, and more intentional than the scattered single-specimen approach almost everyone starts with.
This guide is your complete practical manual. By the end of it you’ll understand exactly why drifts work, how to design them from scratch, which plants to prioritize for maximum bee impact, how to sequence bloom times so your garden is never empty, how to create scent corridors that guide bees from one end of your space to the other, and what a real weekend implementation plan looks like for gardens of any size.

What a Drift Actually Is — And Why It Works
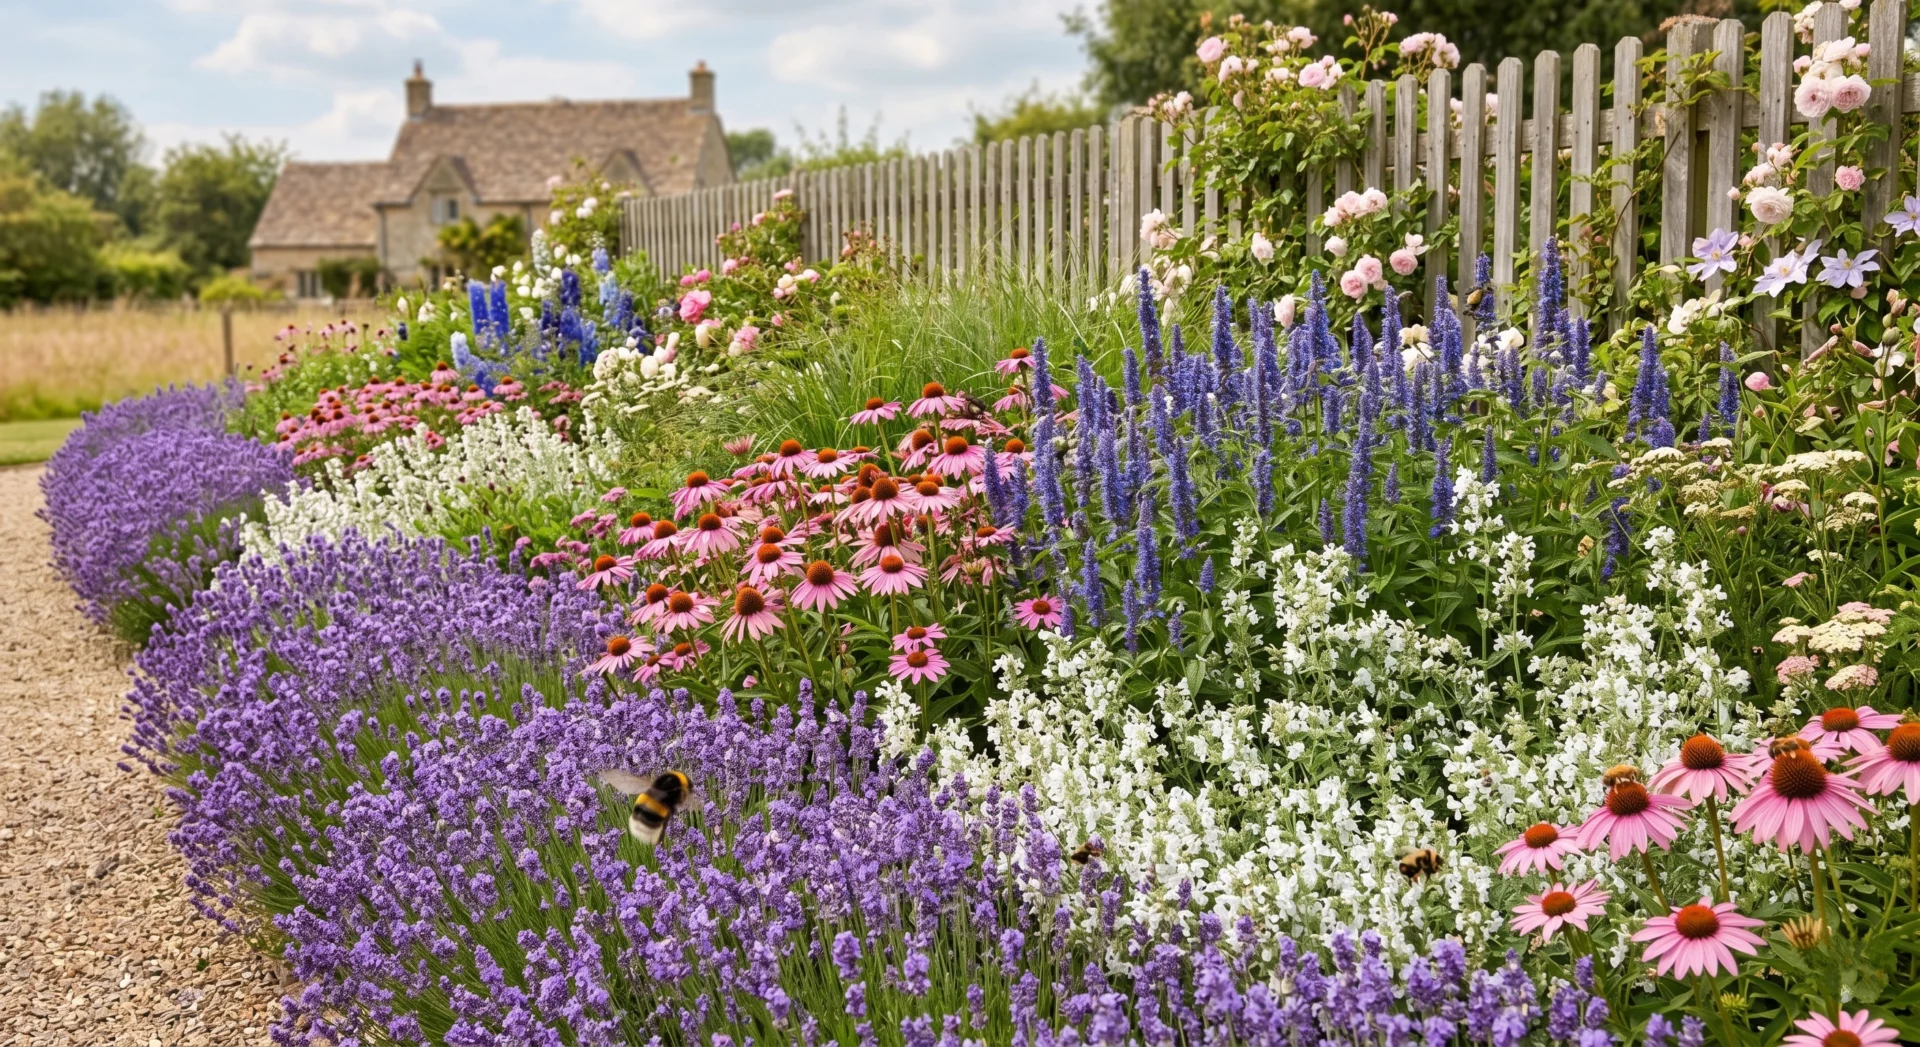
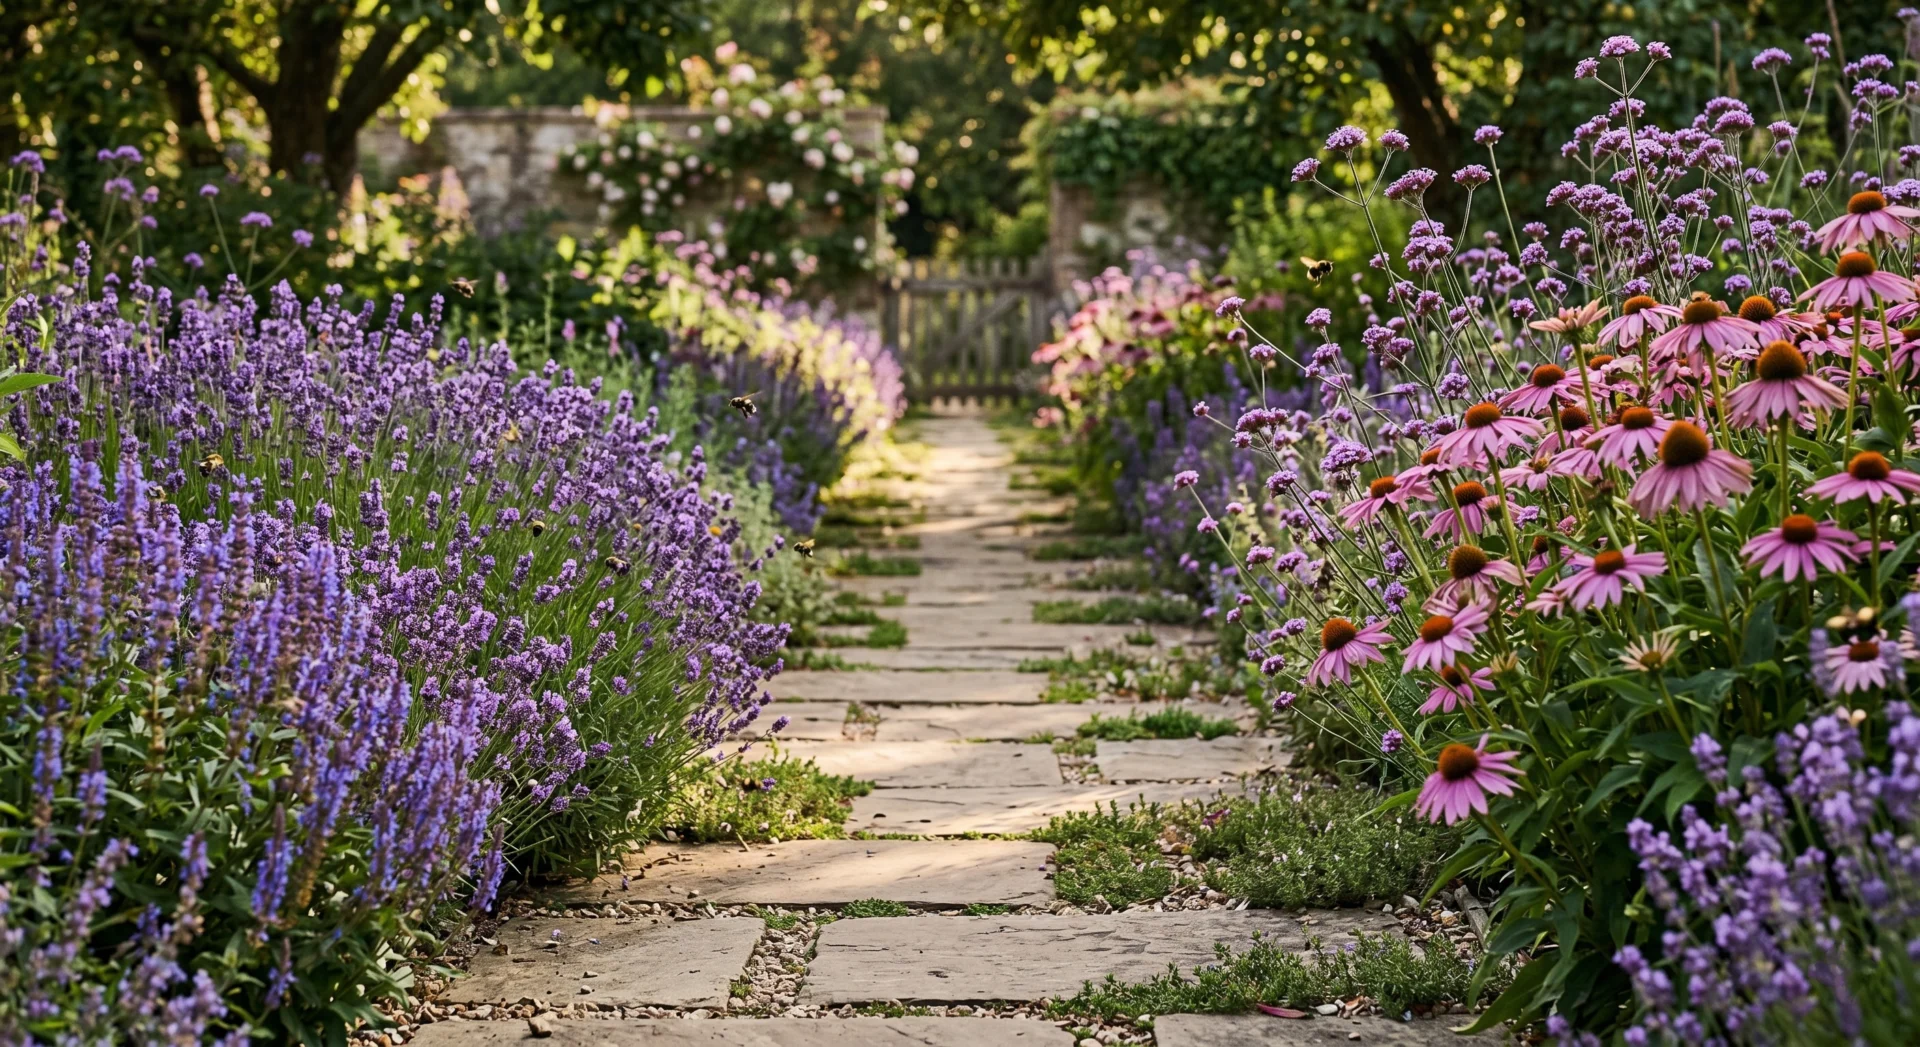
A drift is a mass planting of a single species arranged in a flowing, elongated shape — wider in the middle, tapering at the ends, like a teardrop or a wave. The term comes from traditional landscape design, where drifts of single species were used to create the impression of naturalistic meadow planting rather than the rigid rows of formal bedding.
For bees, the drift works on three distinct levels simultaneously, and understanding all three changes how you think about every planting decision you make.
The first level is scent concentration. A single lavender plant produces a quantity of aromatic volatile compounds that disperses rapidly into the surrounding air. By the time that scent travels ten metres, it’s undetectable against the background noise of a mixed garden. Twenty lavender plants produce twenty times the volatile output, and their scent plumes merge into a concentrated signal that can be detected by foraging bees from distances that would be impossible for a single specimen. Bees locate food sources primarily through scent before they ever use vision — a drift is essentially a flare fired into the air above your garden.
The second level is caloric logic. A foraging bee isn’t just looking for flowers. She’s looking for flowers that justify the energy cost of a return trip to communicate their location back to the hive. A patch large enough to support multiple foragers simultaneously — and to remain productive for many foraging trips across a single day — is a patch worth the investment of a waggle dance. Single specimens rarely clear this threshold. A well-designed drift almost always does.
The third level is visual landmark. Bees use colour and spatial pattern as navigation aids on approach. A large mass of one colour registers as a distinct landmark against the visual noise of a mixed border in a way that scattered specimens simply don’t. Once a forager has visited a drift and noted its position relative to the sun angle and landscape features, she can return to it with extraordinary precision — and that precision is what drives the repeated, sustained visits that make a drift a genuinely productive foraging habitat rather than an occasional stop.

The Science Behind the Shape: Why Drifts Are Elongated, Not Round
The elongated teardrop shape of a classic drift is not an arbitrary aesthetic convention. It’s a functional design that maximizes two things simultaneously: edge-to-area ratio and directional flow through the garden.
Edge-to-area ratio matters because bees tend to approach a planting from the edges first — landing at the perimeter and working inward. A circular clump of the same area as a drift has significantly less edge relative to its interior than the elongated drift shape. More edge means more simultaneous entry points for foragers, which means a larger colony can work the patch productively at the same time without competition. A circular clump of twenty plants might support five simultaneous foragers comfortably. The same twenty plants in a drift shape can support eight to ten.
Directional flow is the design principle that separates a collection of drifts from a genuinely functional garden system. When drifts are oriented diagonally across a bed — each one angled in roughly the same direction, overlapping slightly at their tapered ends — a foraging bee moving from one drift to the next follows a natural path through the garden. She finishes one drift at its tapered end, looks up, and finds the beginning of the next drift almost immediately in her sightline. The garden guides her. She doesn’t have to search. The energy cost of transitioning between patches drops, which means more foraging visits per unit of time and a stronger overall habitat signal.
This is the principle behind the most celebrated naturalistic garden designs — the drifted borders of designers like Piet Oudolf at the High Line in New York and the meadow plantings of the RHS gardens. The aesthetic effect of overlapping diagonal drifts is movement and flow. The ecological effect is a connected foraging network.
How to Design Your Drifts: The Step-by-Step Method
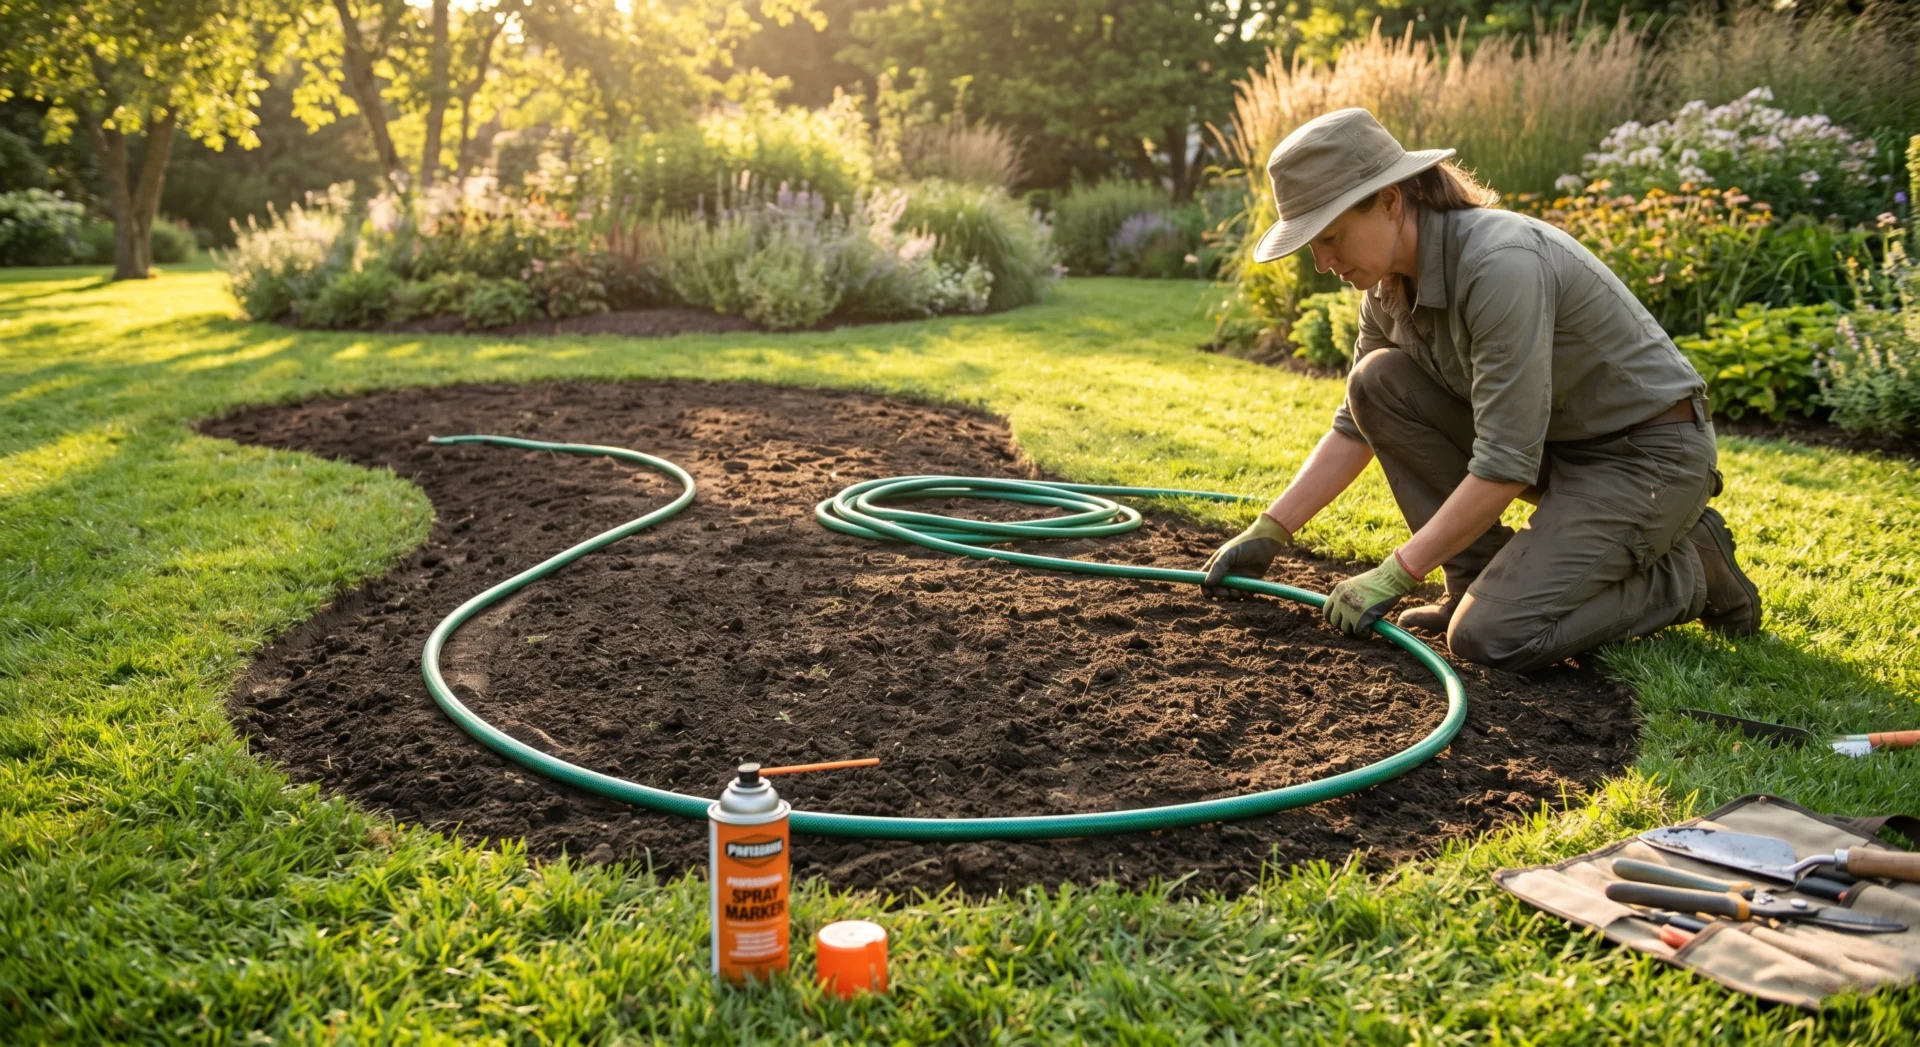
You don’t need a design degree or garden planning software. You need a length of garden hose, a can of biodegradable line marker spray, and an afternoon.
Step 1: Lay out your bed shape first
Before you think about plants, establish the overall bed boundary. A drift garden works in any shape — rectangular border, island bed, front garden strip — but it works best when the bed has at least one dimension of 1.5 metres or more. Narrower than this and you can’t fit true drifts; you end up with rows.
Use the garden hose to define the outer edges of the bed. Curves work better than straight lines for a naturalistic drift design — they allow drifts to taper naturally at the bed edge without being abruptly cut off. Once you’re happy with the shape, mark it with line spray and remove the hose.
Step 2: Decide your drift count and size
A general rule: in a bed up to 3 metres long, plan for 3–4 drifts. In a bed 3–6 metres long, plan for 5–7 drifts. In a bed over 6 metres long, 7–10 drifts. Each drift should contain a minimum of 5 plants — ideally 7–9 for maximum visual and ecological impact. Below 5 plants, you start to lose the mass effect that makes a drift a drift rather than a clump.
Step 3: Draw your drifts diagonally
This is the key step most people skip. Place your drifts at a 30–45 degree angle to the long axis of the bed, not parallel to it. Each drift overlaps slightly with its neighbours at the tapered ends — the tip of one drift sits beside the widest part of the next. This creates the interlocking, flowing pattern that defines great drift design.
Sketch this out on paper first — even a rough pencil sketch is enough. Assign each drift a plant species before you buy anything.
Step 4: Stagger heights front to back, not by drift
Heights in a drift garden are handled differently from a traditional border. Rather than putting tall plants at the back and short plants at the front across the entire border, you allow individual drifts to run from front to back of the bed at their natural height, with neighbouring drifts of different heights creating a varied, naturalistic profile. This avoids the “military rows” look and creates a more three-dimensional, visually interesting planting.
A practical guide: no more than one-third of your drifts should be from the tallest height category. If you have 6 drifts, 2 can be tall (90cm+), 2 medium (45–90cm), and 2 low (under 45cm), arranged so tall and low drifts alternate rather than cluster.
Step 5: Mark drift boundaries in the soil
Using your hose again, lay out each drift shape directly in the planting area — the elongated teardrop shape, positioned diagonally. Mark the outline with line spray or a trail of sand. This gives you a precise planting guide and makes it easy to see before you start digging whether the spacing and proportions look right.
Stand back. Look at it from the house, from the gate, from wherever you most often see the garden. Adjust the shapes until the overlapping diagonal pattern flows the way you want it to.
The Best Plants for a Drift Garden: Species That Deliver
Not all plants work equally well in drifts. The best drift species share three characteristics: they produce nectar continuously over a long period rather than in a short burst, they look good as a mass rather than only as individuals, and they’re robust enough to colonize their drift space over time without requiring constant management.
Here is the definitive list by category, with enough detail to make confident planting decisions.
The Anchor Drifts — Plant These in Every Garden
Lavender (Lavandula angustifolia or L. x intermedia ‘Grosso’ for larger drifts) is the single most effective drift plant for honeybees in a temperate garden. It flowers for six to eight weeks, produces nectar throughout the day rather than only in the morning, has a strong and detectable scent at drift scale, and looks spectacular as a mass. Plant in groups of 7–9 for a medium drift, spacing at 30–40cm. ‘Hidcote’ for compact borders, ‘Grosso’ or ‘Phenomenal’ for larger open spaces.
Catmint (Nepeta ‘Walker’s Low’ or ‘Six Hills Giant’) is the other non-negotiable. It blooms from May to July, then again from September if cut back by half after the first flush. Bumblebees and honeybees work it simultaneously, and the blue-purple flowers mass beautifully. It spreads gently over time, self-filling its drift without invasiveness. Space at 45cm for ‘Walker’s Low’, 60cm for ‘Six Hills Giant’.
The High-Performance Middle Drifts
Echinacea (Echinacea purpurea) brings structural height (60–90cm), a long bloom period from July to September, and seed heads that feed birds through winter — making it genuinely multi-functional. The flat-faced open flowers are perfectly accessible to both long and short-tongued bees. ‘Magnus’ and ‘White Swan’ are the most reliable performers in a drift context. Space at 45cm.
Agastache (Agastache ‘Blue Fortune’ or ‘Black Adder’) is criminally underused. It blooms July to October — some of the longest flowering of any border perennial — produces nectar in quantities that rival lavender, and its upright spikes create excellent visual structure in a drift. It’s also genuinely drought tolerant once established. Space at 40cm, 5–7 plants per drift.
Salvia (Salvia nemorosa ‘Caradonna’ or ‘Mainacht’) flowers May to July with a second flush if dead-headed, grows to 60cm, and produces dense violet-blue spikes that mass spectacularly. Extremely attractive to bumblebees and to the smaller solitary bee species. Space at 35–40cm.
The Season Extenders — Fill the Gaps
Borage (Borago officinalis) is an annual that self-seeds prolifically once established, producing sky-blue star-shaped flowers from June to October. It’s one of the highest-scoring plants in bee visits per hour studies and its nectar replenishes every few minutes — meaning bees return to the same flowers repeatedly throughout the day. Scatter seed directly into a designated drift area in April and thin to 25cm spacing.
Phacelia (Phacelia tanacetifolia) is another annual, this one often described as the single best bee plant available to temperate gardeners. It produces a massed lavender-blue flower head that bees simply cannot leave alone. Sow directly in March or April, thin to 15cm, and expect flowers 8–10 weeks later. It doesn’t transplant well, so always direct-sow.
Verbena bonariensis grows to 1.2–1.5 metres, self-seeds politely, and produces small purple flower clusters on tall branching stems from July to October. It works as a tall “see-through” drift — bees forage it intensely while the airy stems allow views through to the planting behind, preserving the visual depth of the design. Space at 45cm, 5 plants minimum for the drift effect.
The Early Season Opener
Alliums (Allium hollandicum ‘Purple Sensation’ or Allium ‘Globemaster’) bridge the late-spring gap between the spring bulbs and the summer perennials. The large globe-shaped flower heads are covered in tiny individual florets, each producing nectar, and a drift of 15–20 allium bulbs planted 15cm apart and 10cm deep creates a visual spectacle in May that bees work from first light to dusk. They die back completely in summer, leaving space for late-emerging perennials to fill in behind them.
Designing the Scent Corridor: How to Guide Bees Through Your Whole Garden
A single well-designed drift is a local improvement. A connected system of drifts with intentional scent sequencing is something more ambitious — a garden that keeps bees engaged across its entire length from their first visit to their last, and that feels genuinely alive rather than merely pretty.
The scent corridor concept works like this: you position your most strongly-scented drift nearest to the garden entrance or the point where foraging bees are most likely to first enter your space (typically the side closest to open countryside, neighbouring gardens with flowers, or the direction of your apiary if you keep bees). This drift acts as the entry anchor — it catches passing bees first, draws them in, and establishes your garden as a known foraging location.
From the entry anchor, subsequent drifts are positioned so that a bee working her way through the planting always has a visual and olfactory cue pulling her forward. The tapered end of one drift points roughly toward the widest part of the next. Where possible, alternate scent-heavy drifts (lavender, catmint, agastache) with visually prominent drifts (echinacea, verbena, alliums) so the corridor uses both navigation systems — scent and colour — to keep bees moving through the space rather than working one area and leaving.
The exit anchor at the far end of the garden should be a late-season species — agastache, sedum, aster, or verbena bonariensis — that encourages bees to linger into September and October, extending the productive season for your colony or your local wild bee population well beyond what a conventionally planted garden would provide.
In a garden with multiple beds, run this logic across the whole space: the most-scented plants in the bed closest to the garden entrance, connecting pathways of lower plantings between beds, and late-season anchors at the furthest points. You’re creating a trail, not just a destination.
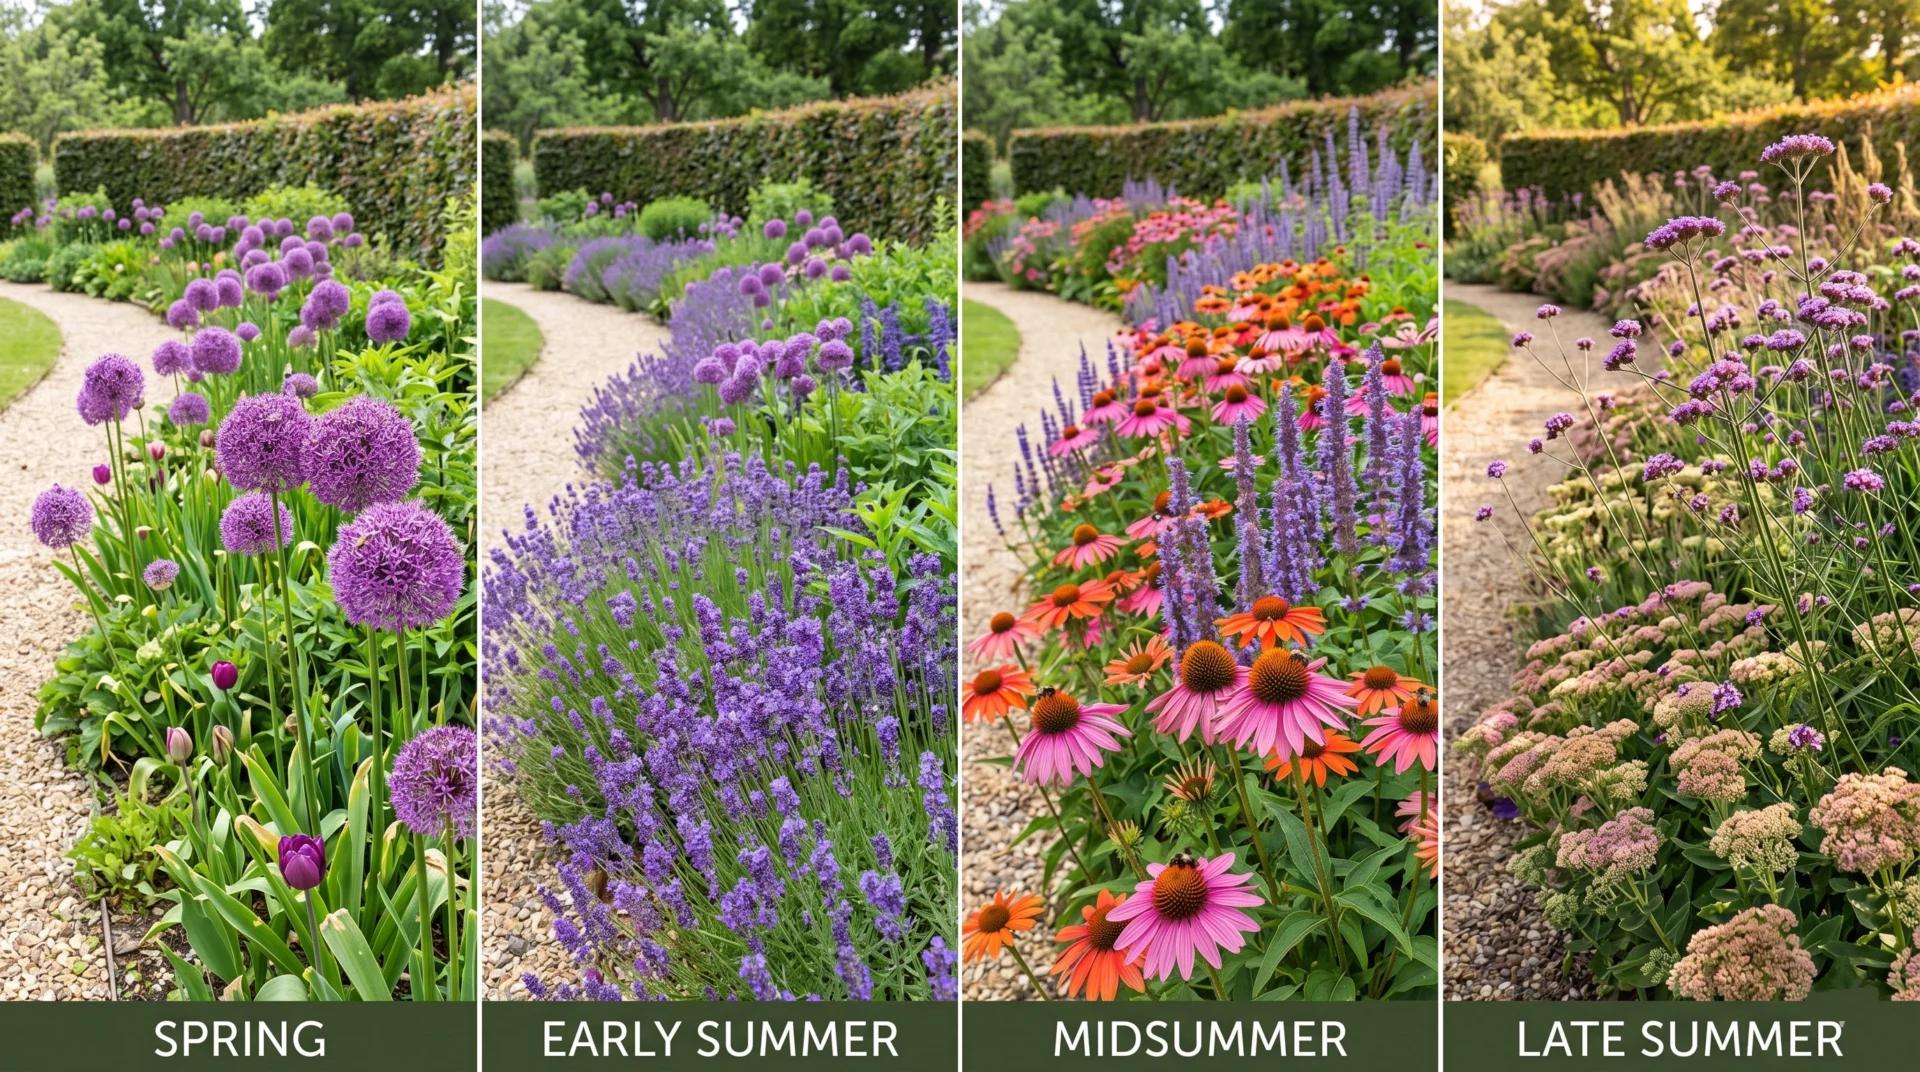
The Bloom Sequence: Designing for March to October
The single most common reason a drift garden underperforms after its first summer is bloom gap. The gardener plants beautifully for June and July, the summer performs brilliantly, and then in August the whole thing goes quiet — the lavender is over, the salvia is finished, nothing is taking their place. The bees, which had been visiting daily, disappear.
Designing against bloom gaps means treating your drift selection as a sequence rather than a collection. Every month from March to October should have at least two drifts in flower simultaneously. Here’s how to achieve it across a bed of 7–8 drifts:
March to April is covered by alliums (planted as bulbs the previous autumn) and by pulmonaria if you want a low ground-level drift at the front of the bed — its pink-to-blue flowers are among the earliest reliable bee sources of the year.
May to June is your first peak. Alliums are still going, salvia comes into flower, catmint begins its first flush, and if you’ve included a drift of early single roses (Rosa rugosa or Rosa ‘Ballerina’) they’ll be starting too.
June to August is your main season. Lavender peaks in late June and runs through July. Echinacea opens in July. Borage, planted as seed in April, is in full flow. Agastache begins in July and will run until October.
August to October is where most gardens fail and yours won’t. Verbena bonariensis peaks in August and goes until first frost. Sedum (Hylotelephium ‘Herbstfreude’ — the classic ice plant) opens in late August and runs through October. Aster flowers September to October. If you’ve managed a drift of ivy (Hedera helix) on a nearby wall or fence — ivy flowers in October and November and is one of the last significant nectar sources of the year.
Write this sequence out as a table before you finalize your plant list. If any month has fewer than two drifts in flower, add a species to fill it. The discipline of sequencing is what separates a garden that works all season from one that’s spectacular for six weeks and dead for the other twenty.
The Weekend Implementation Plan: From Bare Soil to First Drifts in Two Days
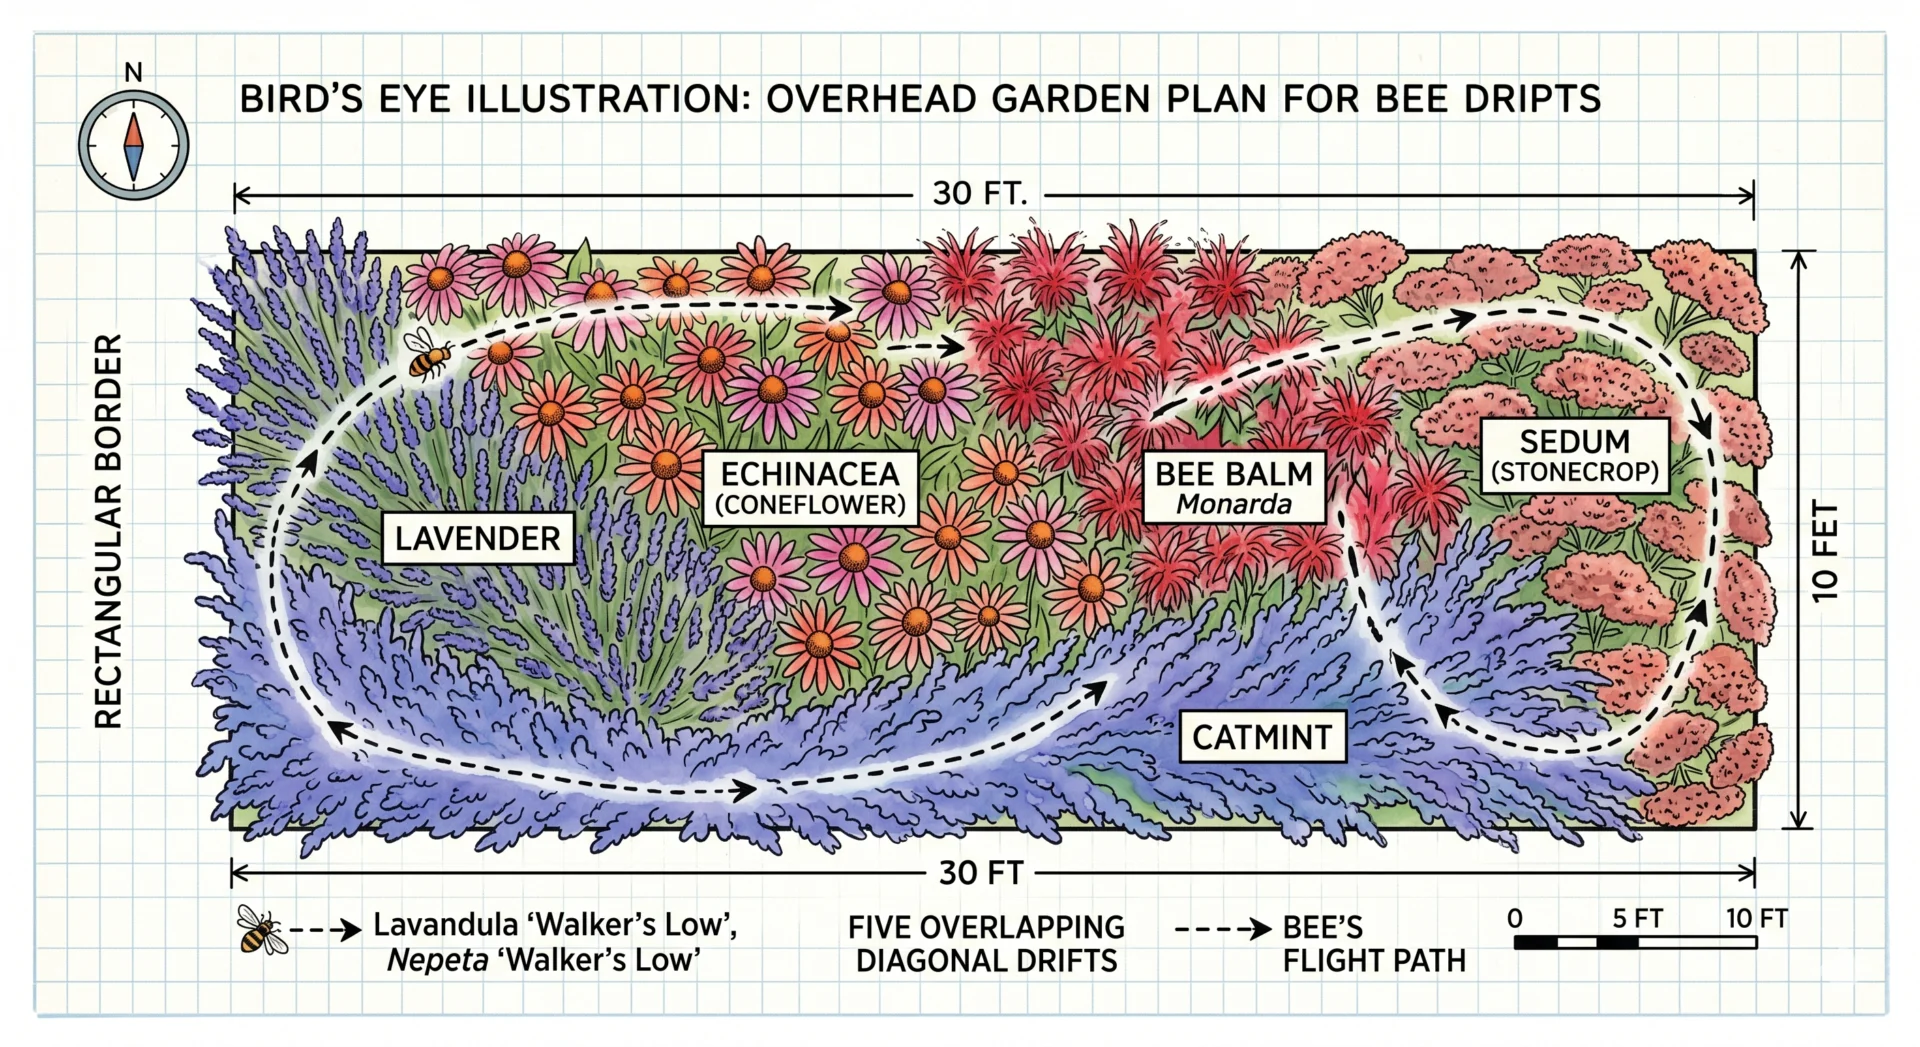
Here is an exact plan for a 4m × 1.5m drift bed — the most common border size in a typical UK or European back garden, and a size that translates directly to a 12-foot × 5-foot bed for North American readers.
Saturday Morning: Preparation
Clear the existing planting or turf. If removing grass, use a flat spade to skim off the top 5cm of turf and stack it grass-down in a corner to compost. Break up the soil to one spade depth (25–30cm), remove any perennial weed roots completely — bindweed, couch grass, and ground elder will recolonize a drift planting aggressively if left in. Incorporate a 5cm layer of garden compost or well-rotted manure across the whole surface and fork it in. Rake level.
Saturday Afternoon: Layout
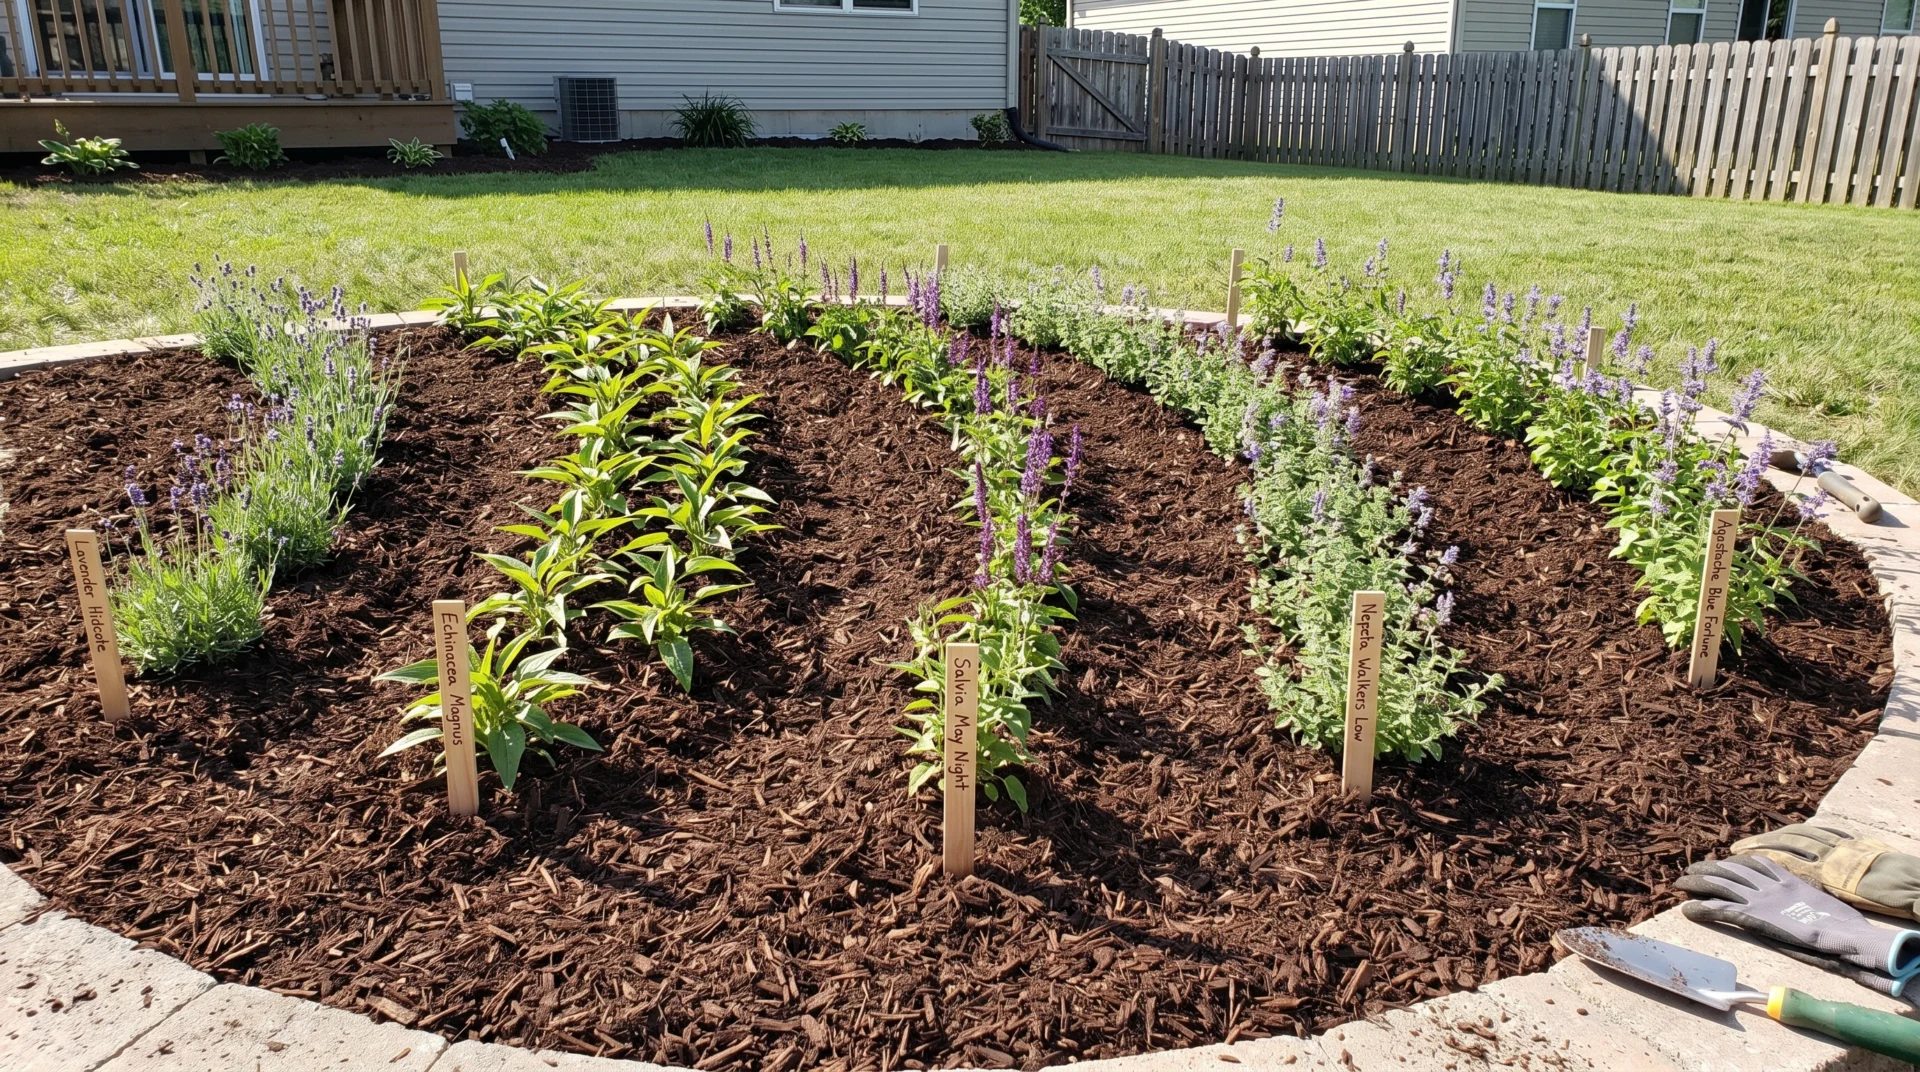
Using your garden hose, lay out 5 drift shapes diagonally across the bed. For a 4m bed, each drift should be approximately 1.2–1.5m long and 50–60cm at its widest point. The drifts overlap at their tapered ends — drift 1’s tip sits beside drift 2’s widest section, and so on across the bed. Mark each drift outline with sand or biodegradable line spray. Label each drift with a cane and a written plant name.
For this bed, the five drifts are: Lavender ‘Hidcote’ (7 plants), Catmint ‘Walker’s Low’ (6 plants), Echinacea purpurea ‘Magnus’ (5 plants), Salvia nemorosa ‘Caradonna’ (7 plants), Agastache ‘Blue Fortune’ (5 plants). Total: 30 plants.
Sunday Morning: Planting
Plant each drift working from the back of the bed forward. Set plants out at their final spacing before planting any of them — stand back and assess the layout before committing. For each plant, dig a hole slightly larger than the root ball, place the plant so the top of the root ball is level with the soil surface, backfill, and firm gently. Water each plant in immediately after planting, even if rain is forecast.
Mulch the entire bed with a 5cm layer of composted bark, leaving a 5cm collar around each plant stem clear of mulch to prevent stem rot. The mulch suppresses weeds, retains moisture, and makes the bed look finished from day one.
Sunday Afternoon: The Annual Layer
In the gaps between the perennial drifts — especially in the first season before the perennials bulk up — direct-sow borage and phacelia seed across the entire bed. Scatter the seed thinly, rake it in lightly, and water. These annuals will fill the visual and ecological gaps in year one and self-seed into subsequent years, gradually finding their own places between the perennial drifts without any further intervention from you.
Total plant cost estimate: 30 perennial plants at an average of £4–£6 / $5–$8 each = £120–£180 / $150–$240. This sounds significant but these plants will establish, spread, and perform for a minimum of 10–15 years. Spread over their lifespan, the cost per year is negligible — and the value to your local bee population is essentially incalculable.
Year Two and Beyond: How a Drift Garden Matures
The first summer after planting is always the most tentative. Plants are establishing roots, not shoots — you’ll get some flowers and some bee visits, but the drift effect won’t be at full power yet. This is normal. Resist the urge to fill gaps with extra plants or to add new species. The empty-looking spaces in year one are space the existing plants need to grow into.
By year two, the change is dramatic. Lavender becomes a rounded, woody-based mound. Catmint sprawls generously, filling its drift and then some. Echinacea has multiplied from one crown to three or four. The agastache has developed deep roots and will flower for months. The borage and phacelia have self-seeded into every gap. The garden looks full, layered, and intentional in a way that took almost no management to achieve.
Your maintenance in year two is simple: cut the catmint back by half in late July after the first flush to encourage a second flowering. Deadhead the echinacea only if you want to prevent self-seeding — if you’re happy for it to naturalize, leave the seed heads through winter for birds and visual structure. Cut everything back to ground level in March, not in autumn — the hollow stems provide overwintering habitat for solitary bees, and the seed heads feed birds through the hungry gap between December and February.
By year three, you have a garden that manages itself, feeds bees from March to October, and looks better every season without ever being replanted. That is the quiet ambition behind every drift you plant.
The Common Mistakes — And How to Avoid Them
Even with the best intentions, drift gardens fail in predictable ways. Here’s what to watch for.
Planting too few. Five plants is the absolute minimum for a drift. Three plants is a clump. Two plants is a pair. The ecological and visual mass effect only begins above five and peaks between seven and ten. If your budget forces a choice between more species with fewer plants each, or fewer species with enough plants to form true drifts, always choose the latter.
Choosing double-flowered cultivars. This point bears repeating because nurseries are full of gorgeous double-flowered versions of otherwise excellent bee plants. Double echinacea, double catmint, ruffled lavender. They look spectacular and are biologically almost useless to bees — the extra petals block access to nectar and pollen. Stick to single-flowered species varieties and you will never go wrong.
Planting in full shade. Nearly every plant on the list above requires full sun or at minimum six hours of direct sun per day to produce nectar at meaningful rates. A drift of lavender in full shade produces virtually no nectar and will be ignored by bees regardless of its size. Assess your sun hours honestly before deciding what goes where.
Spacing too tightly. It’s tempting to plant closer than recommended so the bed looks full immediately. Resist it. Overcrowded plants compete for water and nutrients, grow weakly, and in many cases don’t flower well. They also prevent the natural spreading behaviour that makes a drift self-maintain over time. Stick to the recommended spacings and use annuals to fill the visual gaps in year one.
Treating the drifts as separate. The drift method only delivers its full potential when the drifts are connected — overlapping at their ends, oriented in the same diagonal direction, sequenced for continuous bloom. A collection of unconnected mass plantings is better than scattered specimens, but it’s not yet a drift garden. The connections between the drifts, and the corridor they create together, are what produce the sustained habitat-level impact that makes the difference.

Keep Reading 🐝
The drift method is one piece of a complete bee-friendly garden strategy. These posts give you the rest:
- 🌸 How to design complete garden beds that bees detect by scent and UV before they even arrive — The companion science post to this one, covering bee navigation, UV vision, and mass planting principles in depth.
- 📅 The complete month-by-month bloom calendar so your drift garden never goes quiet between June and October — Essential reading before you finalize your plant list.
- ☠️ Before you finalize your planting list, check which popular garden plants are actually toxic to bees — A few widely sold plants make the drift garden actively harmful. Know which ones before you plant.
You have everything you need. Go mark out your first drift this weekend. 🌻